Posts Tagged "paint brushes"
Stadium Pillows
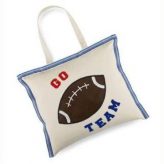
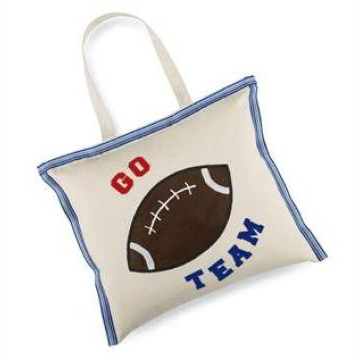 Stadium pillows are a fantastic project for any troop of any age. While my directions mention a football design, you can customize it for any sport and use any combination of colors to represent either professional, local teams or the girls’ school colors. The project is designed to be glued together, but if your girls are older you could easily alter the directions to sew the seams of the stadium pillows instead of glue.
Want to share photos of your troop and finished projects? Contact Us!
![]() Materials Needed:
Materials Needed:
- Large white tote bag
- Iron on letters in team colors
- Tulip Dimensional Fabric Paint – Slick White and Slick Brown
- Black fabric marker
- Ribbon of choice in team colors
- Poly-fil or pillow form
- All-Purpose glue
- Iron
- Scissors
- Pencils
- Paintbrush
- Paper Towels
- Paper Plate

![]() Directions:
Directions:
- Reference this post from Scrapbooking.About.com for a football pattern.
- Cut the tote bag along the side to open.
- Cut one handle from the bag.
- Draw a football with the pencil in center of tote.
- Have an adult follow the directions on the letters and iron the letters onto the tote to say “Go Team”.
- Pour out a small amount of the brown and white paints onto a paper plate. Use a paintbrush to fill in the football design and let dry. Use white to make side and center lines.
- Using white slick paint bottle, draw stitch marks on the ball. Let dry.
- Glue sides of tote together, let dry.
- Fill opening with pillow form or Poly-fil and glue closed.
- Glue ribbon along sides and top of tote.
![]() Safety Tips!
Safety Tips!
- Adults only should handle the iron and iron on the lettering.
- Adult supervision is required.
Chalk Box
This Chalk Box is a great project for Daisy scouts as it’s just peel & stick in terms of decoration. Chalk is safe for all ages. And it can easily be done in a short meeting.
Want to share photos of your troop and finished projects? Contact Us!
![]() Materials Needed:
Materials Needed:
- Decorate Me box
- Black acrylic paint
- Foam flower stickers
- White chalk
- Paint brush
- Paper towels
- Paper plates

![]() Directions:
Directions:
- Paint box black and let dry.
- Remove paper backing from foam flowers and adhere on box.
- Use chalk to personalize.
![]() Safety Tips!
Safety Tips!
- Adult supervision is required at all times.
Fun Personalized Visors
Fun Personalized Visors are a great craft at camp or right before an outdoor trip, hiking or a short camping trip. You can tie this into a lesson about the importance of sunscreen and wearing a hat out in the sun. This project isn’t that messy at all, and only takes about 30 minutes.
Want to share photos of your troop and finished projects? Contact Us!
![]() Materials Needed:
Materials Needed:
- Foam visors
- Foam stickers – shapes & alphabet
- Pencil
- Paintbrush
- Glitter glue
- Decorative scissors

![]() Directions:
Directions:
- Remove paper backing from foam pieces and add to visor.
- Personalize with foam letters along the bottom edge of the visor.
- Use paintbrush & glitter glue to embellish as desired.
- For added fun, use decorative scissors to give the edges of the visors a different look.
![]() Safety Tips!
Safety Tips!
- Adult supervision is required at all times.
Egg Carton Flowers
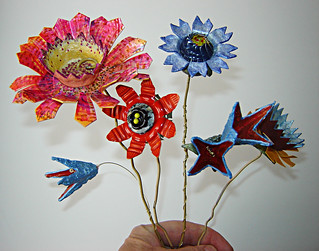 This Egg Carton Flowers craft is a great project around Easter or Mother’s Day for Brownie and Junior girls. It’s a great project for the girls to create small bouquets to give to their mothers, sisters, or anyone special to them. The colors of paint suggested make a nice light palette, but feel free to use different colors to coordinate with the holiday or season nearest to when you decide to do this project. It can be a bit messy, but can also easily be completed in a 30 minute troop meeting.
Want to share photos of your troop and finished projects? Contact Us!![]()
Materials Needed:
- Cardboard egg carton
- Acrylic Paint – Lemon Custard, Baby Pink, Parisian Pink, Jamaican Sea, Lilac Love, Bright Green
- Chenille stems, kelly green
- Pom poms, ¾”assorted colors
- Scissors
- Paintbrush
- All-purpose glue
- Paper towels
- Paper plates
- Antibacterial spray
- Clothespins
![]() Directions:
Directions:
- Cut egg cartons apart, giving you individual “egg cups” to craft with.
- Use scissors to shape flowers, cut slits and create leaves.
- Using the clothespin to hold your flower and leaves, paint as desired. Turn some of the egg cups upside down and glue to the center of another cup to create different sizes and looks.
- Combine colors and shapes. Layer flowers with 2 or more cups.
- Have an adult poke small holes in the bottom of the cups and insert the chenille stems through the hole for the stem. Twist end of stems inside the cup to hold; add glue if needed.
- Glue pom poms to center of flower.
- Glue leaf shapes to chenille stem. Let dry completely before handling.
![]() Safety Tips!
Safety Tips!
- Spray the egg cartons with antibacterial spray before using to ward off any harmful bacteria.
Craft Stick Picture Frame
Craft Stick Picture Frames are great introductory craft project for Daisy scouts, and can be completed in a 30 minute meeting. It can be messy, so make sure the girls have old t-shirts that are okay to get paint on or smocks. These are terrific crafts to do around Mother’s Day and Father’s Day to frame cute pictures of the girls to give to Mom or Dad! You can also use a permanent marker to write messages on the craft sticks, like names or holiday messages.
Want to share photos of your troop and finished projects? Contact Us!
![]() Materials Needed:
Materials Needed:
- Poster paints
- Wooden frame
- Jumbo craft sticks
- Scissors
- Pencil
- Paint brushes
- All-purpose glue
![]() Directions:
Directions:
- Paint the pre-made wooden frame and craft sticks the same color of choice; let dry.
- Glue craft sticks to frame, two on each side.
- Choose the picture to insert. Use framing backing as template to draw around picture and then cut out.
- Place picture in frame.
![]() Safety Tips!
Safety Tips!
- Be sure to use non-toxic paint. The paints linked above are washable and non-toxic for children.
- Check the wooden frames and make sure that they’re sanded and splinters are minimized.