Posts Tagged "acrylic paint"
Chalk Box
This Chalk Box is a great project for Daisy scouts as it’s just peel & stick in terms of decoration. Chalk is safe for all ages. And it can easily be done in a short meeting.
Want to share photos of your troop and finished projects? Contact Us!
![]() Materials Needed:
Materials Needed:
- Decorate Me box
- Black acrylic paint
- Foam flower stickers
- White chalk
- Paint brush
- Paper towels
- Paper plates

![]() Directions:
Directions:
- Paint box black and let dry.
- Remove paper backing from foam flowers and adhere on box.
- Use chalk to personalize.
![]() Safety Tips!
Safety Tips!
- Adult supervision is required at all times.
Egg Carton Flowers
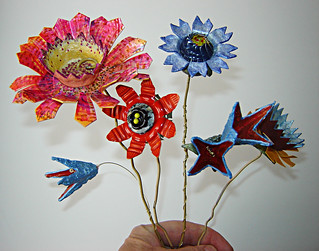 This Egg Carton Flowers craft is a great project around Easter or Mother’s Day for Brownie and Junior girls. It’s a great project for the girls to create small bouquets to give to their mothers, sisters, or anyone special to them. The colors of paint suggested make a nice light palette, but feel free to use different colors to coordinate with the holiday or season nearest to when you decide to do this project. It can be a bit messy, but can also easily be completed in a 30 minute troop meeting.
Want to share photos of your troop and finished projects? Contact Us!![]()
Materials Needed:
- Cardboard egg carton
- Acrylic Paint – Lemon Custard, Baby Pink, Parisian Pink, Jamaican Sea, Lilac Love, Bright Green
- Chenille stems, kelly green
- Pom poms, ¾”assorted colors
- Scissors
- Paintbrush
- All-purpose glue
- Paper towels
- Paper plates
- Antibacterial spray
- Clothespins
![]() Directions:
Directions:
- Cut egg cartons apart, giving you individual “egg cups” to craft with.
- Use scissors to shape flowers, cut slits and create leaves.
- Using the clothespin to hold your flower and leaves, paint as desired. Turn some of the egg cups upside down and glue to the center of another cup to create different sizes and looks.
- Combine colors and shapes. Layer flowers with 2 or more cups.
- Have an adult poke small holes in the bottom of the cups and insert the chenille stems through the hole for the stem. Twist end of stems inside the cup to hold; add glue if needed.
- Glue pom poms to center of flower.
- Glue leaf shapes to chenille stem. Let dry completely before handling.
![]() Safety Tips!
Safety Tips!
- Spray the egg cartons with antibacterial spray before using to ward off any harmful bacteria.
Wall Names
I love this project because the things you can do with it go beyond personalizing a room! I always wanted to make wall names for my room, but sharing it with my brother and not wanting to make one for him too, that was an idea quickly squashed! Kids, especially creative girls, love to put a personal touch on things. With the permission of the parents, this is a great project for girls to help decorate their bedrooms or playrooms. I suggest 7″ letters as they seem to be the most widely available, however you can use whatever size letters you want to make the project more feasible for your troop. Since the wooden letters are the most customized of all the supplies, you can also request that the girl’s supply the letters – they can do their names, or words!
Want to share photos of your troop and finished projects? Contact Us!
![]() Materials Needed:
Materials Needed:
- 7″ tall wood letters for each name (or word)
- Acrylic paint
- Silver glitter spray
- 1 12″ x 12″ piece of scrapbook paper for each letter
- Felt flowers ranging in size
- Fine sandpaper
- Aleene’s Original Tacky Glue
- Glue stick
- Pencils
- Scissors
- Craft knife & cutting mat
- Newspapers
- Paint brushes
- Palette or plastic container
![]() Directions:
Directions:
- Remember, first, to allow the paint to dry between each step.
- Lay down the newspapers to protect your work area. Paint edges all around the letters.
- Plan out what patterns of paper should be used for each letter. Apply the glue stick to the front of the letter and smooth over the paper, removing any air pockets or wrinkles. Turn the letter paper side down onto the cutting mat. Have an adult use the craft knife to cut away the excess paper around the letters.
- You can also use the letters and trace out the shape onto the back side of the paper with a pencil and cut out the letters with scissors, then glue the paper onto the letters.
- Use outward strokes to sand the edges of the letters. This will create a slightly distressed look and secures the paper to the letters.
- Use tacky glue to attach felt flowers or other embellishments of choice to the letters. For a finishing touch, spray glitter spray over the entire letter.
![]() Safety Tips!
Safety Tips!
- Craft knife should only be used by adults, or with adult supervision for older girls.
- Use glitter spray only outside or in a well-ventilated area.
Clothespin Reindeer
This Clothespin Reindeer is a great easy craft for younger girls. I used to make these with my grandmother too, so it’s a great family craft. You can use these very basic instructions or allow the girls to embellish the reindeer clothespins more with paints, glitter, ribbons, etc. Super easy and super cheap.
![]() Materials Needed:
Materials Needed:
- Wood spring clothespins
- #12 flat brush
- Water container
- Palette or plastic plate
- Red mini pom poms
- Small wiggle eyes
- Hot glue gun
- Hot glue sticks
- Thick craft glue
- Honey Brown acrylic paint
![]() Directions:
Directions:
- Paint wood area of three clothespins Honey Brown. Let dry.
- Position two clothespins side-by-side and adhere with glue.
- Position third clothespin in opposite direction and adhere to small end of double clothespins for reindeer head.
- Position and adhere eyes and pom pom nose.
![]() Safety Tips!
Safety Tips!
- Adults should work with the hot glue gun only.
Sand Art Magnets
Sand Art Magnets are a great project for Daisies, Brownies, and even Junior Girl Scouts, but the project can take up to an hour, so if your meetings are only half an hour long, you might want to do the painting during one meeting and the sand embellishing during the next. This is a messy project with the sand, so be sure to have smocks or old adult shirts ready to minimize the chance of stains on the girls’ clothes. You will also want to have old newspapers down on the tables to make clean up of the excess sand easier.
This is an easy project to theme. Standard unfinished wooden shapes can be bought in multi-packs but you can also go to craft stores to get larger unique shapes one at a time, such as horseshoes, flowers, animals, etc. For example, if the girls are in the process of learning about insects for a badge, you can easily get bees or ladybug shaped wood piece to paint. Using a theme will also help limit how much paint and sand you buy to keep to the colors of the theme and project – for instance you don’t need purple if all the girls are making bees or ladybugs.
![]() Materials Needed:
Materials Needed:
- Unfinished wood shapes
- Acrylic paint
- Craft sand
- Craft magnets
- Foam brush
- Paint brush
- All-Purpose glue
![]() Directions:
Directions:
- Use the foam brush to paint the shapes in the desired colors. Let the paint dry.
- Use the paint brushes to paint lines of glue onto the painted shapes where you want the sand to adhere to.
- Sprinkle the sand onto the wet glue and shake the excess sand off onto a newspaper or scrap paper to catch the sand.
- Repeat steps 2 & 3 for each color sand you use. It works best to use one color of sand at a time to avoid mixing the sands together. Start with the darkest and end with the lightest.
- Once the glue is completely dry, attach magnets to the back of each and let dry before using. You can glue individual craft magnets onto the wood pieces or use magnetic strips with adhesive backing. Usually the strips come in a roll that can be cut into pieces the right size.
![]() Safety Tips!
Safety Tips!
- Make sure to use glue that is kid-safe. Not only does it work the best, but you don’t want to use a toxic glue.
- For added stability in the magnets, an adult can use a hot glue gun to attach the magnets.
- Look at the packaging for the acrylic paint and make sure you’re using a non-toxic, kid friendly paint. If you cannot find kid-friendly acrylic paint, ask someone at your local craft store for a recommendation on a non-toxic paint that will work for this project.
Consider how thick the wood pieces are before deciding what kind of magnet to use. You want to make sure that the magnet won’t fail when stuck to a refrigerator – nothing is worse than a girl bringing home her wonderful creation only to put it on the fridge and have it fall to the floor and break 🙁
Read More