Posts Tagged "Fiskars"
Woven Placemats
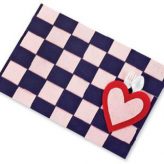
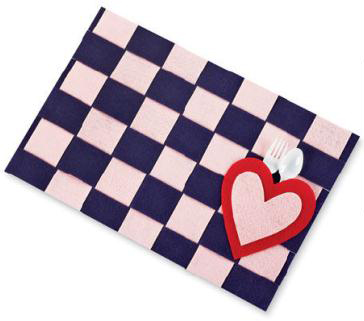 These quick woven felt placemats are an easy craft that can even be done multiple times per year. These can be decorated with different colors and designs, not just hearts for Valentine’s Day, but Thanksgiving, Christmas, St. Patrick’s Day, and more!
Want to share photos of your troop and finished projects? Contact Us!
![]() Materials Needed:
Materials Needed:
- Scissors
- Ruler
- 2 Pink felt sheets
- 1 Purple felt sheet
- 1 Red felt sheet
- Aleene’s Original Tacky Glue
- Sponge
- Chalk

![]() Directions:
Directions:
- Start with a sheet of purple felt. Fold it in half.
- While the felt is still folded, draw a series of lines across the fold about 2″ apart. Do not draw them all the way to the edge – leave about ½” at the edge.
- Use chalk and the ruler to draw the lines before cutting the felt. Use a damp sponge afterward to wipe off the chalk once the mat is put together.
- Starting on the folded end of the felt, cut along all the lines. When you unfold the piece of felt, there should be ½” border that is uncut.
- Using a sheet of pink felt, cut strips about 2″ wide that are as long as the width of the purple felt.
- Lay the purple felt on a table so it’s lengthwise. Starting on the upper left corner, help the girls weave a pink strip down through the first slit, up through the second, down through the third, and so on through all the slits.
- Weave the second strip of pink through the purple so it alternates from the first strip. Make sure that each new piece of felt is pushed up next to the previously woven piece.
- Continue weaving strips in this way until there’s no room for any more strips.
- When you’re done weaving, secure each strip of woven felt using glue. You might also have to trim the woven edges a bit to make the edges of the place mat even.
- Trace a heart onto the red felt, and then a smaller heart onto the pink felt, trying to keep the same basic shape of the heart. Cut out the pieces. Only glue the edge of the “v” of the larger heart onto the mat as shown. This will leave a pocket to hold the silverware. Glue the smaller heart onto the larger heart. Let dry before using your woven placemats!
![]() Safety Tips!
Safety Tips!
- Adult supervision is required at all times.
- Adults should handle the scissors and cutting when working with younger girls.
Summer Key Chain & Necklace
 This Summer Key Chain & Necklace project is perfect to celebrate the coming of summer! You can easily customize it by finding beads or charms that reflect any of the activities your troop did over the summer. For example, if your girls went to summer camp, you could find wooden beads or a metal tree charm to attach to the end of the key chain.
Want to share photos of your troop and finished projects? Contact Us!
![]() Materials Needed:
Materials Needed:
- Alphabet beads
- Assorted summer-themed beads
- Plastic lacing
- Scissors
- Large plastic hooks


![]() Necklace Directions:
Necklace Directions:
- Thread large turtle bead onto necklace cord.
- Working on one side at a time, add a star then alphabet beads to spell “summer”. Add another star, contrasting bead, and another star.
- On the opposite side, add a star then alphabet beads to spell “rocks”, using a heart bead as the “o”. Add another star, contrasting bead, and another star.
- Tie off the cord at the ends.
![]() Keychain Directions:
Keychain Directions:
- Cut a 12″ piece of stretch lacing. Fold it in half and place the folded end through the hole at the bottom of the plastic hook, bringing the ends through the look creating a “larks head” knot onto the keyring.
- With the cords together, slide on a silver bead, palm tree bead, and another silver bead.
- Separate the cords and ad beads as desired to personalize the key chain with a name, troop number, camp name, unit, or anything else you want!
- Bring both sides together again and add a silver bead, a sun bead, and another silver bead.
- Tie the ends together and trim the excess cording.
![]() Safety Tips!
Safety Tips!
- Adult supervision is required when using scissors.
Ziggety-Zag Bracelets
 Ziggety-Zag Bracelets are great quick projects to start at a meeting and let girls finish at their own leisure at home. Please refer to the Friendship Bracelet Knots page for instructions on how to make the knots mentioned below.
Want to share photos of your troop and finished projects? Contact Us!
![]() Materials Needed:
Materials Needed:
- 4 colors of craft thread
- Masking tape or safety pins
- Ruler or measuring tape
- Scissors
![]() Directions:
Directions:
- Cut 4 colors of craft thread to 65″ lengths.
- Fold strands in half together, make a loop and knot at the top. Tape or pin the knot to your workstation.
- Arrange the color strands: A,A,B,B,C,C,D,D.
- Starting with strand A on the left, make 7 left-hand knots. A onto A, A onto B, etc.
- Continue making left hand knots with each strand until you come to the last D strand.
- With the last D strand, make 6 left-hand knots and one left-right knot.
- Starting with the right D strand, make 7 right-hand knots. Continue making 7 right-hand knots with each of the strands on the right until you get to the last A strand.
- With the last A strand, make 6 right knots and one right-left knots.
- Using the same A strand, make 6 left-hand knots.
- Repeat from step 4 until you have reached your desired bracelet length.
- Once the bracelet is long enough, tie a knot at the end, leaving a 4″ tail and trim.
- Wrap the bracelet around your wrist and tie the tail end to the looped end.
![]() Safety Tips!
Safety Tips!
- Only older girls should use the safety pins to secure the starting end of the bracelet.
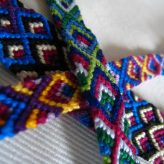
5 Color Chevron Bracelets
This 5 Color Chevron Bracelet is a great craft to start at a short meeting and let the girls take home to finish later. Please refer to the Friendship Bracelet Knots page for instructions on how to make the knots mentioned below.
Want to share photos of your troop and finished projects? Contact Us!
![]() Materials Needed:
Materials Needed:
- 5 colors of craft thread
- Masking tape or safety pins
- Ruler or tape measure
- Scissors
![]() Directions:
Directions:
- Cut two 65″ lengths of each color for 10 strands total.
- Even out all the strands and together, fold all in half to form a loop at the top and knot. Pin together or tape the loop to your work surface.
- Arrange the strands in mirror order for these colors: A,B,C,D,E – E,D,C,B,A.
- Start on the right with strand A. Working towards the center, make four right-hand knots: A onto B, A onto C, etc. Stop at the center.
- With strand A from the left side, make 5 left-hand knots. A onto B, A onto C, etc. The fifth knot should join the 2 middle strands together. Your color order should now be B,C,D,E,A – A,E,D,C,B.
- Repeat steps 4 and 5 until the bracelet is the desired length.
- Once the bracelet is long enough, tie a knot at the end, leaving a 4″ tail and trim.
- Wrap the bracelet around your wrist and tie the tail end to the looped end.
![]() Safety Tips!
Safety Tips!
- Only older girls should use the safety pins to secure the starting end of the bracelet.
3 Color Chevron Bracelets
3 Color Chevron Bracelets are a great project for girls to start in a short meeting or craft session and finish later in their down time. Please refer to the Friendship Bracelet Knots page for instructions on how to make the knots mentioned below.
Want to share photos of your troop and finished projects? Contact Us!
![]() Materials Needed:
Materials Needed:
- 3 colors of craft thread
- Ruler or tape measure
- Scissors
- Masking tape or safety pins
![]() Directions:
Directions:
- Cut four 36″ lengths of color A, two 36″ lengths of color B, and two 36″ lengths of color C.
- Make sure the ends are even, loop one end and knot together. Pin or tape the loop to your work surface.
- Arrange the strands in this color order: A,A,B,C,C,B,A,A
- On the left side, make a left knot with A onto A. Repeat knot with A onto B, then with A onto C.
- On the right side, make a right knot with A onto A. Repeat with A onto B, then with A on C.
- Make a right knot in the center with A onto A to complete the V shape.
- Repeat steps 4 and 5, working with the outside threads to the center.
- Once the bracelet is long enough for your wrist, tie a knot at the end, leaving a 4″ tail and trim.
- Wrap the bracelet around your wrist and tie the tail end to the looped end.
![]() Safety Tips!
Safety Tips!
- Only older girls should use the safety pins to secure the starting end of the bracelet.