Posts Tagged "glue"
Woven Placemats
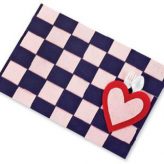
 These quick woven felt placemats are an easy craft that can even be done multiple times per year. These can be decorated with different colors and designs, not just hearts for Valentine’s Day, but Thanksgiving, Christmas, St. Patrick’s Day, and more!
Want to share photos of your troop and finished projects? Contact Us!
![]() Materials Needed:
Materials Needed:
- Scissors
- Ruler
- 2 Pink felt sheets
- 1 Purple felt sheet
- 1 Red felt sheet
- Aleene’s Original Tacky Glue
- Sponge
- Chalk

![]() Directions:
Directions:
- Start with a sheet of purple felt. Fold it in half.
- While the felt is still folded, draw a series of lines across the fold about 2″ apart. Do not draw them all the way to the edge – leave about ½” at the edge.
- Use chalk and the ruler to draw the lines before cutting the felt. Use a damp sponge afterward to wipe off the chalk once the mat is put together.
- Starting on the folded end of the felt, cut along all the lines. When you unfold the piece of felt, there should be ½” border that is uncut.
- Using a sheet of pink felt, cut strips about 2″ wide that are as long as the width of the purple felt.
- Lay the purple felt on a table so it’s lengthwise. Starting on the upper left corner, help the girls weave a pink strip down through the first slit, up through the second, down through the third, and so on through all the slits.
- Weave the second strip of pink through the purple so it alternates from the first strip. Make sure that each new piece of felt is pushed up next to the previously woven piece.
- Continue weaving strips in this way until there’s no room for any more strips.
- When you’re done weaving, secure each strip of woven felt using glue. You might also have to trim the woven edges a bit to make the edges of the place mat even.
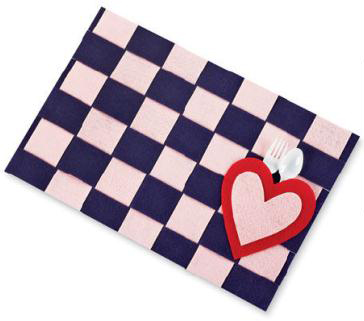
- Trace a heart onto the red felt, and then a smaller heart onto the pink felt, trying to keep the same basic shape of the heart. Cut out the pieces. Only glue the edge of the “v” of the larger heart onto the mat as shown. This will leave a pocket to hold the silverware. Glue the smaller heart onto the larger heart. Let dry before using your woven placemats!
![]() Safety Tips!
Safety Tips!
- Adult supervision is required at all times.
- Adults should handle the scissors and cutting when working with younger girls.
Dragonfly Friends
 Dragonfly Friends is a great craft to start the new year off right, especially if you’re adding new girls to your troop. You can have each girl make a dragonfly friend and then swap them randomly, and those two girls will be buddies for the next field trip or outing.
Want to share photos of your troop and finished projects? Contact Us!
![]() Materials Needed:
Materials Needed:
![]() Directions:
Directions:
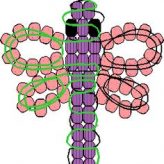
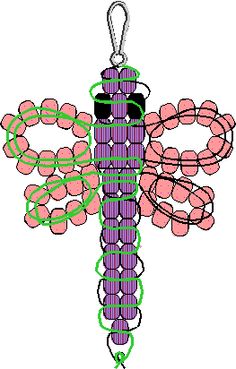
- Cut 6″ piece of chenille stem; fold in half.
- Slide 9 pony beads onto the folded chenille stem, leaving the folded end about ¼” exposed.
- Glue mini pom pom onto folded end.
- Glue 1″ pom pom to other end of the chenille stem for the head.
- Using another chenille stem, fold the ends in towards the center, overlapping the ends at the center by an inch. Shape the ends to create loops, twisting the loose ends around the center to create a bow. Position the overlap ends for legs.
- Glue wings between beads and head.
- Glue wiggle eyes in place.
![]() Safety Tips!
Safety Tips!
- Adult supervision is required.
Snowman Glass Ornament
The snowman glass ornaments are a great holiday project for girls of all ages. Younger girls may require a bit more help with shaping the clay pieces, but that’s where the creativity can come through. The project takes about 30 minutes, baking included.
Want to share photos of your troop and finished projects? Contact Us!
![]() Materials Needed:
Materials Needed:
- Modeling clay – Red, Black, Orange, & White
- Sculpey clay tool
- Clear glass ornaments
- Ribbon
- Quick drying glue
- Wax paper
- Aluminum foil
- 12″ piece of white tree garland

![]() Directions:
Directions:
- Knead clay for 2 minutes before shaping.
- Remove metal cap/hanger from the ornament. Remove the wire hanger from the cap and set it aside. Make a red clay disk slightly larger than the diameter of the ornament cap.
- Wrap the red clay disk around the edges of the ornament cap. Using the 2 mm pointer tool from the starter set, poke holes through the red clay so the holes in the cap remain open to replace the hanger later.
- Make 2 wide red strips for the headband and 2 large red domes for the ear muffs. Then make 2 medium black disks for eyes and 3 little disks for the mouth. Make 2 tiny white eye highlights and an orange cone shape for the nose.
- Place the face pieces firmly onto the ornament, making sure each piece follows the curve of the glass. With the blunt point tool from the starter set, texture the ear muffs. With the flat knife tool, texture the nose. Make sure the clay covered cap will go back on and that the ear muff headband does not interfere with the fitting of the cap.
- Bake on oven-proof glass or metal surface at 275° F for 15 minutes per 6 mm of thickness. To keep the ornament from rolling around in the oven, make a little bowl from foil for it to sit in.
- Allow the ornament to cool completely, then gently remove the clay pieces. Glue them back on permanently and allow to dry. The clay cap covering will not need to be glued on.
- Replace the wire hanger into the holes of the cap. Fill the ornament with the white tree garland. Replace the cap and add the ribbon.
![]() Safety Tips!
Safety Tips!
- Do not use unbaked clay on unprotected furniture or finished surfaces. Good working surfaces include glass or metal, disposable foil or wax paper.
- Do not use a plastic ornament or it will melt in the oven. Glass only.
- Do not use in a microwave oven.
- All banking should be completed by an adult.
- Wash hands after use.
Pipe Cleaner Turkey
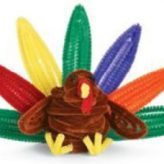
 The Pipe Cleaner Turkey is a terrific Thanksgiving project! This project is perfect for Brownies and Juniors, and can be easily done in 30-60 minutes. I would be helpful for the leader to complete one before the girls attempt it so it’s easier to help them. As well, the girls may need a model in person to refer to.
Want to share photos of your troop and finished projects? Contact Us!
![]() Materials Needed:
Materials Needed:

![]() Directions:
Directions:
- Bend 1 brown chenille in half. Set on work surface. To make head, connect 6 brown chenille by twisting ends together. Wrap around the large round marker overlapping so that the length does not exceed 2 inches. Glue the bent brown chenille into the head piece. Set aside.
- Take one brown chenille and wrap around the highlighter without overlapping to make the neck. Slip over the remaining chenille sticking out of head. Glue the top edge into head. Bend the chenille wire holding head/neck assembly into an upside down U shape. Set aside.
- The body requires 24 brown chenille stems that are connected and wrapped around the large paint bottle. Slip off bottle and gently squeeze into an oval shape. Pick up head/neck assembly, and glue into the body. Make sure the head is bent over the top of body, as if turkey is looking at you. Set aside.
- To make a wing, connect two brown chenille stems. Refer to photo to see shape of wings. They are shaped by hand. The stems touch only at the top of the wings. Glue them together along top to hold shape. Repeat for second wing. Twist wing ends together, so that they are 2 ½ inches apart. Glue wings onto turkey back.
- Bend the wire at the top of the back in, to close off opening behind head. Set aside. Cut one yellow chenille in half to make feet. Take one of the halves, and bend it in half. Measure ¾ ” back from bend, and bend the chenille at a 90 degree angle. Twist the ¾” together then separate the strands. Bend one piece up to make a V shape for the second toe. Measure and bend stem back at the ¾” mark. Repeat for third toe.
- Repeat step to shape other foot. Bend the leg ends up ½” from end, and glue into body base front edge. Set aside.
- Cut a 4″ piece of yellow to form beak. Bend in half, and then half again. Attach to head with glue. See photo for placement. Set in front of you. Cut a 4″ piece of red to form warble. Bend one end to fit over top of beak, allowing 1-¾” to hang down. Bend remaining back up, and twist to secure. Glue onto top of beak. See photo if necessary. Place turkey in front of you.
- Roll one end of black chenille into a little ball. Cut stem 1″ from rolled end. Stick stem end into head, and glue into place. Repeat for second eye. Refer to photo if necessary.
- You need five stems for each feather: 15 green, 5 red, 5 yellow, 5 purple and 5 orange. Twist 5 of the same color together and make a bend 7″ from one end to form an upside down V. The next bend should be 6″ further. Each time you go up into the feather shape, the next V should be slightly smaller to fit inside the previous one. Repeat until all the feathers are assembled.
- Lay 2 green feathers with their twisted ends together forming a horizontal line. Glue the purple and yellow feathers on top of the green ends to form a V shape at the top. Attach the orange and red feathers in like manner so they lay above the 2 green feathers at base. Glue the last green feather slightly above the orange/red ends. Refer to photo if necessary. Glue entire tail onto back base of your turkey.
![]() Safety Tips!
Safety Tips!
- When twisting the chenille stems together to connect, be careful because the ends can be sharp.
- Adult supervision is required.
Craft Stick Picture Frame
Craft Stick Picture Frames are great introductory craft project for Daisy scouts, and can be completed in a 30 minute meeting. It can be messy, so make sure the girls have old t-shirts that are okay to get paint on or smocks. These are terrific crafts to do around Mother’s Day and Father’s Day to frame cute pictures of the girls to give to Mom or Dad! You can also use a permanent marker to write messages on the craft sticks, like names or holiday messages.
Want to share photos of your troop and finished projects? Contact Us!
![]() Materials Needed:
Materials Needed:
- Poster paints
- Wooden frame
- Jumbo craft sticks
- Scissors
- Pencil
- Paint brushes
- All-purpose glue
![]() Directions:
Directions:
- Paint the pre-made wooden frame and craft sticks the same color of choice; let dry.
- Glue craft sticks to frame, two on each side.
- Choose the picture to insert. Use framing backing as template to draw around picture and then cut out.
- Place picture in frame.
![]() Safety Tips!
Safety Tips!
- Be sure to use non-toxic paint. The paints linked above are washable and non-toxic for children.
- Check the wooden frames and make sure that they’re sanded and splinters are minimized.