Pipe Cleaner Turkey
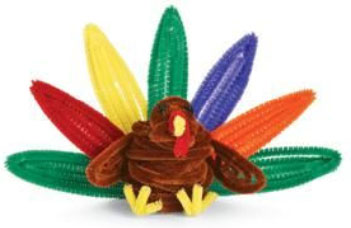
 The Pipe Cleaner Turkey is a terrific Thanksgiving project! This project is perfect for Brownies and Juniors, and can be easily done in 30-60 minutes. I would be helpful for the leader to complete one before the girls attempt it so it’s easier to help them. As well, the girls may need a model in person to refer to.
Want to share photos of your troop and finished projects? Contact Us!
![]() Materials Needed:
Materials Needed:

![]() Directions:
Directions:
- Bend 1 brown chenille in half. Set on work surface. To make head, connect 6 brown chenille by twisting ends together. Wrap around the large round marker overlapping so that the length does not exceed 2 inches. Glue the bent brown chenille into the head piece. Set aside.
- Take one brown chenille and wrap around the highlighter without overlapping to make the neck. Slip over the remaining chenille sticking out of head. Glue the top edge into head. Bend the chenille wire holding head/neck assembly into an upside down U shape. Set aside.
- The body requires 24 brown chenille stems that are connected and wrapped around the large paint bottle. Slip off bottle and gently squeeze into an oval shape. Pick up head/neck assembly, and glue into the body. Make sure the head is bent over the top of body, as if turkey is looking at you. Set aside.
- To make a wing, connect two brown chenille stems. Refer to photo to see shape of wings. They are shaped by hand. The stems touch only at the top of the wings. Glue them together along top to hold shape. Repeat for second wing. Twist wing ends together, so that they are 2 ½ inches apart. Glue wings onto turkey back.
- Bend the wire at the top of the back in, to close off opening behind head. Set aside. Cut one yellow chenille in half to make feet. Take one of the halves, and bend it in half. Measure ¾ ” back from bend, and bend the chenille at a 90 degree angle. Twist the ¾” together then separate the strands. Bend one piece up to make a V shape for the second toe. Measure and bend stem back at the ¾” mark. Repeat for third toe.
- Repeat step to shape other foot. Bend the leg ends up ½” from end, and glue into body base front edge. Set aside.
- Cut a 4″ piece of yellow to form beak. Bend in half, and then half again. Attach to head with glue. See photo for placement. Set in front of you. Cut a 4″ piece of red to form warble. Bend one end to fit over top of beak, allowing 1-¾” to hang down. Bend remaining back up, and twist to secure. Glue onto top of beak. See photo if necessary. Place turkey in front of you.
- Roll one end of black chenille into a little ball. Cut stem 1″ from rolled end. Stick stem end into head, and glue into place. Repeat for second eye. Refer to photo if necessary.
- You need five stems for each feather: 15 green, 5 red, 5 yellow, 5 purple and 5 orange. Twist 5 of the same color together and make a bend 7″ from one end to form an upside down V. The next bend should be 6″ further. Each time you go up into the feather shape, the next V should be slightly smaller to fit inside the previous one. Repeat until all the feathers are assembled.
- Lay 2 green feathers with their twisted ends together forming a horizontal line. Glue the purple and yellow feathers on top of the green ends to form a V shape at the top. Attach the orange and red feathers in like manner so they lay above the 2 green feathers at base. Glue the last green feather slightly above the orange/red ends. Refer to photo if necessary. Glue entire tail onto back base of your turkey.
![]() Safety Tips!
Safety Tips!
- When twisting the chenille stems together to connect, be careful because the ends can be sharp.
- Adult supervision is required.