Jingle Bell Wreath

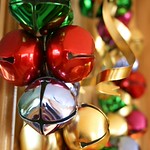 This Jingle Bell Wreath is a great holiday project for older girls. Depending on how well your girls’ motor skills are, you might attempt this project with a younger set of girls, but try doing this yourself to see how difficult it is for you before having girls attempt it.
Want to share photos of your troop and finished projects? Contact Us!
![]() Materials Needed:
Materials Needed:
- Heavy gauge floral wire
- Jingle Bells – Red
- Jingle Bells – Green
- Jingle Bells – Gold
- Chenille stems – gold, green, red
- Broad width ribbon – red
![]() Directions:
Directions:
- Make a circular loop with the heavy gauge floral wire.
- String bells along wire and fit them closely together around the length of the loop.
- Use a pipe cleaner to wind around the bells at either end of the loop to hold the wreath shape together in a circle.
- Tie a bow around a pipe cleaner and then tie that pipe cleaner around the part of the loop that was joined together.
![]() Safety Tips!
Safety Tips!
- Adult supervision is required.
- Have all the materials ready before beginning the project.
Tie Dye Shirts

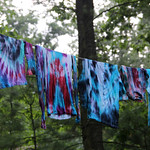 This was one of the most fun projects we did at summer camp. Yes, it’s messy but tie dye shirts are a great project that girls of all ages can enjoy – and enjoy wearing! If you’re doing this for a camp, you should include a white shirt specially for crafts on the packing list. To boot, Tie Dye Shirts make for a great souvenir to bring home from camp. For a troop activity, you can either buy the t-shirts for your girls or send home a request for them to send an old white or really light colored t-shirt for the project.
Want to share photos of your troop and finished projects? Contact Us!
![]() Materials Needed:
Materials Needed:
- Tulip One-Step Tie Dye Kit Rainbow
- White t-shirt
- Rubber bands
- Plastic gloves
- Plastic tablecloth
- Scissors
![]() Directions:
Directions:
- Wash the t-shirt in a clothes washer to remove sizing.
- Cover your work surface with the plastic tablecloth.
- Place the damp shirt on your prepared surface and smooth flat. To create a traditional bulls-eye design, pinch the front of the shirt just above the center then lift fabric up and scrunch fabric into a tube shape. Wrap a rubber band about 2″ from the tip, wrapping several times until tight. Repeat every 2″ or so along the entire shirt.
- Wearing gloves from the dye box, fill a dye bottle halfway with water. Replace the cap and shake until all the dye is thoroughly mixed. Remove the lid, add more water to the line indicated on bottle, and replace the cap and shake to mix.
- Carefully squeeze one color of dye on tip, turning shirt until entire tip has dye.
- Squeeze another color dye around center of next section, letting it bleed toward rubber bands. Insert tip of bottle into folds and squeeze more dye as needed.
- Avoid squeezing the dye too close to the rubber bands so you can leave white rings between the colors. Rotate through the colors available in the kit evenly.
- Let the dye set 4-6 hours. Use scissors to carefully cut off the rubber bands.
- Fill a clothes washer to a full load setting with a small amount of laundry soap. Once agitation strts, insert the t-shirt. Dry in clothes dryer or line dry.
![]() Safety Tips!
Safety Tips!
- Adult supervision is required when using the dye.
- Adults should cut off the rubber bands when working with younger girls.
Pipe Cleaner Turkey
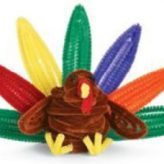
 The Pipe Cleaner Turkey is a terrific Thanksgiving project! This project is perfect for Brownies and Juniors, and can be easily done in 30-60 minutes. I would be helpful for the leader to complete one before the girls attempt it so it’s easier to help them. As well, the girls may need a model in person to refer to.
Want to share photos of your troop and finished projects? Contact Us!
![]() Materials Needed:
Materials Needed:

![]() Directions:
Directions:
- Bend 1 brown chenille in half. Set on work surface. To make head, connect 6 brown chenille by twisting ends together. Wrap around the large round marker overlapping so that the length does not exceed 2 inches. Glue the bent brown chenille into the head piece. Set aside.
- Take one brown chenille and wrap around the highlighter without overlapping to make the neck. Slip over the remaining chenille sticking out of head. Glue the top edge into head. Bend the chenille wire holding head/neck assembly into an upside down U shape. Set aside.
- The body requires 24 brown chenille stems that are connected and wrapped around the large paint bottle. Slip off bottle and gently squeeze into an oval shape. Pick up head/neck assembly, and glue into the body. Make sure the head is bent over the top of body, as if turkey is looking at you. Set aside.
- To make a wing, connect two brown chenille stems. Refer to photo to see shape of wings. They are shaped by hand. The stems touch only at the top of the wings. Glue them together along top to hold shape. Repeat for second wing. Twist wing ends together, so that they are 2 ½ inches apart. Glue wings onto turkey back.
- Bend the wire at the top of the back in, to close off opening behind head. Set aside. Cut one yellow chenille in half to make feet. Take one of the halves, and bend it in half. Measure ¾ ” back from bend, and bend the chenille at a 90 degree angle. Twist the ¾” together then separate the strands. Bend one piece up to make a V shape for the second toe. Measure and bend stem back at the ¾” mark. Repeat for third toe.
- Repeat step to shape other foot. Bend the leg ends up ½” from end, and glue into body base front edge. Set aside.
- Cut a 4″ piece of yellow to form beak. Bend in half, and then half again. Attach to head with glue. See photo for placement. Set in front of you. Cut a 4″ piece of red to form warble. Bend one end to fit over top of beak, allowing 1-¾” to hang down. Bend remaining back up, and twist to secure. Glue onto top of beak. See photo if necessary. Place turkey in front of you.
- Roll one end of black chenille into a little ball. Cut stem 1″ from rolled end. Stick stem end into head, and glue into place. Repeat for second eye. Refer to photo if necessary.
- You need five stems for each feather: 15 green, 5 red, 5 yellow, 5 purple and 5 orange. Twist 5 of the same color together and make a bend 7″ from one end to form an upside down V. The next bend should be 6″ further. Each time you go up into the feather shape, the next V should be slightly smaller to fit inside the previous one. Repeat until all the feathers are assembled.
- Lay 2 green feathers with their twisted ends together forming a horizontal line. Glue the purple and yellow feathers on top of the green ends to form a V shape at the top. Attach the orange and red feathers in like manner so they lay above the 2 green feathers at base. Glue the last green feather slightly above the orange/red ends. Refer to photo if necessary. Glue entire tail onto back base of your turkey.
![]() Safety Tips!
Safety Tips!
- When twisting the chenille stems together to connect, be careful because the ends can be sharp.
- Adult supervision is required.
Stadium Pillows
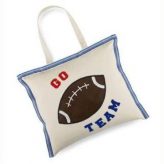
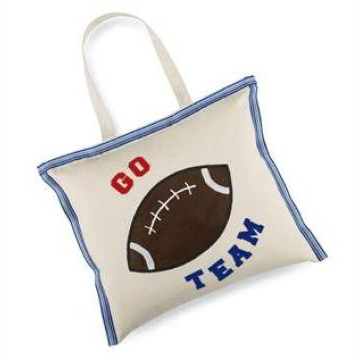 Stadium pillows are a fantastic project for any troop of any age. While my directions mention a football design, you can customize it for any sport and use any combination of colors to represent either professional, local teams or the girls’ school colors. The project is designed to be glued together, but if your girls are older you could easily alter the directions to sew the seams of the stadium pillows instead of glue.
Want to share photos of your troop and finished projects? Contact Us!
![]() Materials Needed:
Materials Needed:
- Large white tote bag
- Iron on letters in team colors
- Tulip Dimensional Fabric Paint – Slick White and Slick Brown
- Black fabric marker
- Ribbon of choice in team colors
- Poly-fil or pillow form
- All-Purpose glue
- Iron
- Scissors
- Pencils
- Paintbrush
- Paper Towels
- Paper Plate

![]() Directions:
Directions:
- Reference this post from Scrapbooking.About.com for a football pattern.
- Cut the tote bag along the side to open.
- Cut one handle from the bag.
- Draw a football with the pencil in center of tote.
- Have an adult follow the directions on the letters and iron the letters onto the tote to say “Go Team”.
- Pour out a small amount of the brown and white paints onto a paper plate. Use a paintbrush to fill in the football design and let dry. Use white to make side and center lines.
- Using white slick paint bottle, draw stitch marks on the ball. Let dry.
- Glue sides of tote together, let dry.
- Fill opening with pillow form or Poly-fil and glue closed.
- Glue ribbon along sides and top of tote.
![]() Safety Tips!
Safety Tips!
- Adults only should handle the iron and iron on the lettering.
- Adult supervision is required.
Chalk Box
This Chalk Box is a great project for Daisy scouts as it’s just peel & stick in terms of decoration. Chalk is safe for all ages. And it can easily be done in a short meeting.
Want to share photos of your troop and finished projects? Contact Us!
![]() Materials Needed:
Materials Needed:
- Decorate Me box
- Black acrylic paint
- Foam flower stickers
- White chalk
- Paint brush
- Paper towels
- Paper plates

![]() Directions:
Directions:
- Paint box black and let dry.
- Remove paper backing from foam flowers and adhere on box.
- Use chalk to personalize.
![]() Safety Tips!
Safety Tips!
- Adult supervision is required at all times.
Fun Personalized Visors
Fun Personalized Visors are a great craft at camp or right before an outdoor trip, hiking or a short camping trip. You can tie this into a lesson about the importance of sunscreen and wearing a hat out in the sun. This project isn’t that messy at all, and only takes about 30 minutes.
Want to share photos of your troop and finished projects? Contact Us!
![]() Materials Needed:
Materials Needed:
- Foam visors
- Foam stickers – shapes & alphabet
- Pencil
- Paintbrush
- Glitter glue
- Decorative scissors

![]() Directions:
Directions:
- Remove paper backing from foam pieces and add to visor.
- Personalize with foam letters along the bottom edge of the visor.
- Use paintbrush & glitter glue to embellish as desired.
- For added fun, use decorative scissors to give the edges of the visors a different look.
![]() Safety Tips!
Safety Tips!
- Adult supervision is required at all times.