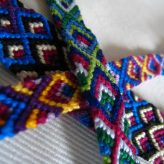
Diagonal Knotted Bracelet

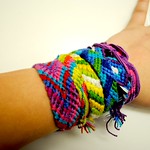 A Diagonal Knotted Bracelet is a great project to start during a shorter meeting or craft session and have the girls finish later in their down time. Please refer to the Friendship Bracelet Knots page for instructions on how to make the knots mentioned below.
Want to share photos of your troop and finished projects? Contact Us!
![]() Materials Needed:
Materials Needed:
- 5 colors of craft thread
- Masking tape or safety pins
- Rulers or tape measure
- Scissors
![]() Directions:
Directions:
- Cut 2 pieces of each color thread to 36″ in length.
- Make sure the ends are even and loop one end and knot together. Tape or pin down in the order you want the colored stripes.
- Start on the left side and make a left knot with the first color. Make left knots with this color across the remaining strands.
- Start again on the left side and make left knots across with the other strands.
- Repeat knots always starting with the left thread and working left to right. A diagonal pattern will begin to form.
- Work until the length is right for your wrist.
- Once the bracelet is long enough, tie a knot at the end, leaving a 4″ tail and trim.
- Wrap the bracelet around your wrist and tie the tail end to the looped end.
![]() Safety Tips!
Safety Tips!
- Only older girls should use the safety pins to secure the starting end of the bracelet.
Easy Braided Bracelet
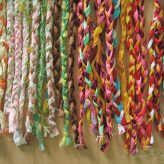
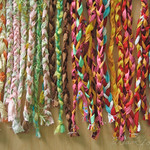 Easy Braided Bracelets and Friendship bracelets in general are one of the most classic crafts done at camps world-wide, and one of my favorites. There are a few basic types of friendship bracelets, but this is the easiest. It may not be challenging enough for older girls, but it’s perfect for younger girls making their first friendship bracelet.
Want to share photos of your troop and finished projects? Contact Us!
![]() Materials Needed:
Materials Needed:
- 3 colors of craft thread
- Masking tape or safety pins
- Ruler or tape measure
- Scissors
![]() Directions:
Directions:
- Cut 5 pieces each of 3 colors of craft thread. Each piece should be 24″ long.
- With all the ends even, loop together at one end and knot. This loop will be the closure.
- Tape or pin the looped end on a clipboard, pillow, or book to hold it in place while you are braiding.
- Separate the 3 colors and braid together, taking the left group over the center group, then the right group over the new center group until the braid is long enough to wrap around your wrist.
- Once the braid is long enough, tie a knot at the end, leaving a 4″ tail and trim.
- Wrap the bracelet around your wrist and tie the tail end to the looped end.
![]() Safety Tips!
Safety Tips!
- Only older girls should use the safety pins to secure the starting end of the bracelet.
Friendship Bracelet Knots
 There are a number of types of knots to be used when making friendship bracelets. Here’s some descriptions of those knots.
Left-Hand Knot:
Start with the thread on the left. Loop the left thread over, around and under the thread to the right. Bring through and pull upwards towards the right side. Repeat to finish the knot.
Right-Hand Knot:
Start with the thread on the right. Loop the right thread over, around and under the thread to the left. Bring through and pull upwards towards the left side. Repeat to finish the knot.
Left-Right Knot:
This knot starts as a left-hand knot and ends as a right-hand knot so that the starting thread ends up on the left when the knot is complete.
Right-Left Knot:
This knot starts as a right-hand knot and ends with a left-hand knot so that the starting thread ends up on the right side when the knot is completed.
Dragonfly Friends
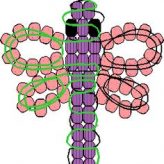
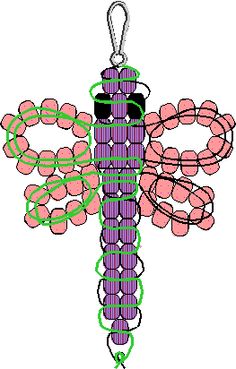 Dragonfly Friends is a great craft to start the new year off right, especially if you’re adding new girls to your troop. You can have each girl make a dragonfly friend and then swap them randomly, and those two girls will be buddies for the next field trip or outing.
Want to share photos of your troop and finished projects? Contact Us!
![]() Materials Needed:
Materials Needed:
![]() Directions:
Directions:
- Cut 6″ piece of chenille stem; fold in half.
- Slide 9 pony beads onto the folded chenille stem, leaving the folded end about ¼” exposed.
- Glue mini pom pom onto folded end.
- Glue 1″ pom pom to other end of the chenille stem for the head.
- Using another chenille stem, fold the ends in towards the center, overlapping the ends at the center by an inch. Shape the ends to create loops, twisting the loose ends around the center to create a bow. Position the overlap ends for legs.
- Glue wings between beads and head.
- Glue wiggle eyes in place.
![]() Safety Tips!
Safety Tips!
- Adult supervision is required.
Snowman Glass Ornament
The snowman glass ornaments are a great holiday project for girls of all ages. Younger girls may require a bit more help with shaping the clay pieces, but that’s where the creativity can come through. The project takes about 30 minutes, baking included.
Want to share photos of your troop and finished projects? Contact Us!
![]() Materials Needed:
Materials Needed:
- Modeling clay – Red, Black, Orange, & White
- Sculpey clay tool
- Clear glass ornaments
- Ribbon
- Quick drying glue
- Wax paper
- Aluminum foil
- 12″ piece of white tree garland

![]() Directions:
Directions:
- Knead clay for 2 minutes before shaping.
- Remove metal cap/hanger from the ornament. Remove the wire hanger from the cap and set it aside. Make a red clay disk slightly larger than the diameter of the ornament cap.
- Wrap the red clay disk around the edges of the ornament cap. Using the 2 mm pointer tool from the starter set, poke holes through the red clay so the holes in the cap remain open to replace the hanger later.
- Make 2 wide red strips for the headband and 2 large red domes for the ear muffs. Then make 2 medium black disks for eyes and 3 little disks for the mouth. Make 2 tiny white eye highlights and an orange cone shape for the nose.
- Place the face pieces firmly onto the ornament, making sure each piece follows the curve of the glass. With the blunt point tool from the starter set, texture the ear muffs. With the flat knife tool, texture the nose. Make sure the clay covered cap will go back on and that the ear muff headband does not interfere with the fitting of the cap.
- Bake on oven-proof glass or metal surface at 275° F for 15 minutes per 6 mm of thickness. To keep the ornament from rolling around in the oven, make a little bowl from foil for it to sit in.
- Allow the ornament to cool completely, then gently remove the clay pieces. Glue them back on permanently and allow to dry. The clay cap covering will not need to be glued on.
- Replace the wire hanger into the holes of the cap. Fill the ornament with the white tree garland. Replace the cap and add the ribbon.
![]() Safety Tips!
Safety Tips!
- Do not use unbaked clay on unprotected furniture or finished surfaces. Good working surfaces include glass or metal, disposable foil or wax paper.
- Do not use a plastic ornament or it will melt in the oven. Glass only.
- Do not use in a microwave oven.
- All banking should be completed by an adult.
- Wash hands after use.
Jingle Bell Wreath

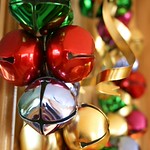 This Jingle Bell Wreath is a great holiday project for older girls. Depending on how well your girls’ motor skills are, you might attempt this project with a younger set of girls, but try doing this yourself to see how difficult it is for you before having girls attempt it.
Want to share photos of your troop and finished projects? Contact Us!
![]() Materials Needed:
Materials Needed:
- Heavy gauge floral wire
- Jingle Bells – Red
- Jingle Bells – Green
- Jingle Bells – Gold
- Chenille stems – gold, green, red
- Broad width ribbon – red
![]() Directions:
Directions:
- Make a circular loop with the heavy gauge floral wire.
- String bells along wire and fit them closely together around the length of the loop.
- Use a pipe cleaner to wind around the bells at either end of the loop to hold the wreath shape together in a circle.
- Tie a bow around a pipe cleaner and then tie that pipe cleaner around the part of the loop that was joined together.
![]() Safety Tips!
Safety Tips!
- Adult supervision is required.
- Have all the materials ready before beginning the project.