Posts Tagged "chenille stems"
Dragonfly Friends

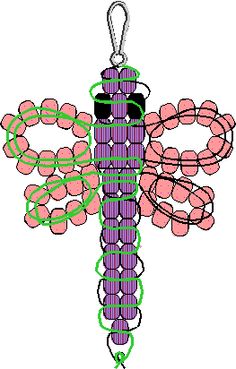 Dragonfly Friends is a great craft to start the new year off right, especially if you’re adding new girls to your troop. You can have each girl make a dragonfly friend and then swap them randomly, and those two girls will be buddies for the next field trip or outing.
Want to share photos of your troop and finished projects? Contact Us!
![]() Materials Needed:
Materials Needed:
![]() Directions:
Directions:
- Cut 6″ piece of chenille stem; fold in half.
- Slide 9 pony beads onto the folded chenille stem, leaving the folded end about ¼” exposed.
- Glue mini pom pom onto folded end.
- Glue 1″ pom pom to other end of the chenille stem for the head.
- Using another chenille stem, fold the ends in towards the center, overlapping the ends at the center by an inch. Shape the ends to create loops, twisting the loose ends around the center to create a bow. Position the overlap ends for legs.
- Glue wings between beads and head.
- Glue wiggle eyes in place.
![]() Safety Tips!
Safety Tips!
- Adult supervision is required.
Jingle Bell Wreath

 This Jingle Bell Wreath is a great holiday project for older girls. Depending on how well your girls’ motor skills are, you might attempt this project with a younger set of girls, but try doing this yourself to see how difficult it is for you before having girls attempt it.
Want to share photos of your troop and finished projects? Contact Us!
![]() Materials Needed:
Materials Needed:
- Heavy gauge floral wire
- Jingle Bells – Red
- Jingle Bells – Green
- Jingle Bells – Gold
- Chenille stems – gold, green, red
- Broad width ribbon – red
![]() Directions:
Directions:
- Make a circular loop with the heavy gauge floral wire.
- String bells along wire and fit them closely together around the length of the loop.
- Use a pipe cleaner to wind around the bells at either end of the loop to hold the wreath shape together in a circle.
- Tie a bow around a pipe cleaner and then tie that pipe cleaner around the part of the loop that was joined together.
![]() Safety Tips!
Safety Tips!
- Adult supervision is required.
- Have all the materials ready before beginning the project.
Egg Carton Flowers
 This Egg Carton Flowers craft is a great project around Easter or Mother’s Day for Brownie and Junior girls. It’s a great project for the girls to create small bouquets to give to their mothers, sisters, or anyone special to them. The colors of paint suggested make a nice light palette, but feel free to use different colors to coordinate with the holiday or season nearest to when you decide to do this project. It can be a bit messy, but can also easily be completed in a 30 minute troop meeting.
Want to share photos of your troop and finished projects? Contact Us!![]()
Materials Needed:
- Cardboard egg carton
- Acrylic Paint – Lemon Custard, Baby Pink, Parisian Pink, Jamaican Sea, Lilac Love, Bright Green
- Chenille stems, kelly green
- Pom poms, ¾”assorted colors
- Scissors
- Paintbrush
- All-purpose glue
- Paper towels
- Paper plates
- Antibacterial spray
- Clothespins
![]() Directions:
Directions:
- Cut egg cartons apart, giving you individual “egg cups” to craft with.
- Use scissors to shape flowers, cut slits and create leaves.
- Using the clothespin to hold your flower and leaves, paint as desired. Turn some of the egg cups upside down and glue to the center of another cup to create different sizes and looks.
- Combine colors and shapes. Layer flowers with 2 or more cups.
- Have an adult poke small holes in the bottom of the cups and insert the chenille stems through the hole for the stem. Twist end of stems inside the cup to hold; add glue if needed.
- Glue pom poms to center of flower.
- Glue leaf shapes to chenille stem. Let dry completely before handling.
![]() Safety Tips!
Safety Tips!
- Spray the egg cartons with antibacterial spray before using to ward off any harmful bacteria.