Diagonal Knotted Bracelet

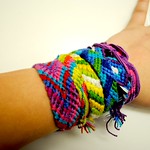 A Diagonal Knotted Bracelet is a great project to start during a shorter meeting or craft session and have the girls finish later in their down time. Please refer to the Friendship Bracelet Knots page for instructions on how to make the knots mentioned below.
Want to share photos of your troop and finished projects? Contact Us!
![]() Materials Needed:
Materials Needed:
- 5 colors of craft thread
- Masking tape or safety pins
- Rulers or tape measure
- Scissors
![]() Directions:
Directions:
- Cut 2 pieces of each color thread to 36″ in length.
- Make sure the ends are even and loop one end and knot together. Tape or pin down in the order you want the colored stripes.
- Start on the left side and make a left knot with the first color. Make left knots with this color across the remaining strands.
- Start again on the left side and make left knots across with the other strands.
- Repeat knots always starting with the left thread and working left to right. A diagonal pattern will begin to form.
- Work until the length is right for your wrist.
- Once the bracelet is long enough, tie a knot at the end, leaving a 4″ tail and trim.
- Wrap the bracelet around your wrist and tie the tail end to the looped end.
![]() Safety Tips!
Safety Tips!
- Only older girls should use the safety pins to secure the starting end of the bracelet.
Brownie Smile Song

Without a doubt, this has got to be the first song you learn as a Brownie Girl Scout! I was personally not a Daisy scout, so this is very likely the first Girl Scout song I ever learned! It’s still cute and makes me smile when I hear it in my head.
I’ve got something in my pocket
That belongs upon my face,
I keep it very close to me in a most convenient place.
I’m sure you couldn’t guess it if you guessed a long, long while,
So I’ll take it out and put it on,
It’s a great big Brownie Smile!
Easy Braided Bracelet
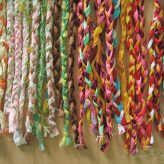
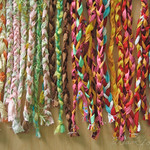 Easy Braided Bracelets and Friendship bracelets in general are one of the most classic crafts done at camps world-wide, and one of my favorites. There are a few basic types of friendship bracelets, but this is the easiest. It may not be challenging enough for older girls, but it’s perfect for younger girls making their first friendship bracelet.
Want to share photos of your troop and finished projects? Contact Us!
![]() Materials Needed:
Materials Needed:
- 3 colors of craft thread
- Masking tape or safety pins
- Ruler or tape measure
- Scissors
![]() Directions:
Directions:
- Cut 5 pieces each of 3 colors of craft thread. Each piece should be 24″ long.
- With all the ends even, loop together at one end and knot. This loop will be the closure.
- Tape or pin the looped end on a clipboard, pillow, or book to hold it in place while you are braiding.
- Separate the 3 colors and braid together, taking the left group over the center group, then the right group over the new center group until the braid is long enough to wrap around your wrist.
- Once the braid is long enough, tie a knot at the end, leaving a 4″ tail and trim.
- Wrap the bracelet around your wrist and tie the tail end to the looped end.
![]() Safety Tips!
Safety Tips!
- Only older girls should use the safety pins to secure the starting end of the bracelet.