Pinwheels
This is a great project for younger girls, as the pinwheels work pretty well but older girls might be a bit disappointed that they don’t work perfectly but they’re still awesome! That doesn’t really matter since, in my experience, pinwheels are really a toy more suited for younger girls anyway. You can spice up the project and colors by getting a pack of assorted colored drinking straws instead of plain white ones. The best straws are straight and not the kind with the bend in them.
Want to share photos of your troop and finished projects? Contact Us!
![]() Materials Needed:
Materials Needed:
- White construction paper
- Crayons, colored pencils, or markers.
- Plastic drinking straws
- Scissors
- Pencils
- Brass paper fasteners
- Pinwheel pattern.
![]() Directions:
Directions:
- Print the pinwheel pattern. You can reproduce this pattern on white construction paper with a copy machine. Be sure to cut the construction paper to 8½ in. by 11 in. You can also print the pattern out onto thicker colored paper directly.
- Cut out the pattern along the solid lines.
- Decorate the un-folded paper. Stickers might not work so well due to the folding and aerodynamics, but any other crayons, colored pencils, or markers should be fine for decorations.
- Cut the dotted lines from the four corners to the center circle, doing your best not to cut into the center circle.
- Use the sharpened pencil to poke a hole through the four tiny dark circles. The pencil point also works well to poke a hole into the straw, though you can also have an adult use a nail or a very small diameter hole punch. Carefully push the pencil point through the straw about ½” inch from the top.
- Make the tiny holes on the four points meet at the center circle.
- Push the brass fastener ends through the holes on the pinwheel. then push the fastener through the center circle.
- Place the straw on the back side of your pinwheel and push the ends of the fastener through the hole in the straw. Open-up the fastener by flattening the ends in opposite directions.
![]() Safety Tips!
Safety Tips!
- Adults should always make the holes when using a sharp object and working with younger girls.
- DO NOT allow the girls to punch holes with a nail if that’s the only implement you have.
- Adult supervision required when younger girls are using scissors.
![]() Quick Shopping for This Project
Quick Shopping for This Project
- Pacon Corporation Tru-Ray Construction Paper 9″x12″ White
- Crayola® Crayons – 64 Ct.
- Crayola® Classic Broadline Markers – 10 ct.
- Crayola Colored Pencils – 64ct.
- ACCO(R) Round-Head Solid Brass Fasteners, No. 4R, 1in., Box Of 100
- Drinking Straws
- Fiskars Creative Works Comfort Grip 7″ Scissors
Basic Wound Care
It is important to be able to identify a wound and care for it. Accidents are common, especially when participating in outdoor activities. While all serious injuries should be checked out by a doctor or other health care professional, leaders and camp counselors should know basic wound care to attend to an injury between the accident site and a trip to a medic. Wounds are subject to infection and bleeding, so attention is required. A wound is defined as a break in the skin or mucous membrane. It is caused by force and usually extends into the underlying tissue. Wounds may be classified into four types:
- Abrasions, made by rubbing or scraping. Floor burns or scuff burns, although called burns, are actually wounds.
- Incised wounds, sharp cuts that tend to bleed freely.
- Lacerated wounds, jagged or irregular wounds, often associated with much tissue damage.
- Puncture wounds. A tack, run through the skin, makes a typical, small puncture wound.
Caring for wounds in which bleeding is not severe is easily done. All adults working with children should know the basic steps.
- Wash your hands thoroughly with clean water and soap.
- Cleanse the injury thoroughly, using plain soap and boiled water cooled to room temperature or clean running tap water and soap.
- Apply the soap and water with a sterile dressing.
- Apply a dry sterile or clean dressing, and bandage it snugly into place.
- See a doctor promptly if evidence of infection appears.
For wounds in which bleeding is server, the objective is to stop the bleeding at once. Always stop the bleeding with pressure directly over the wound with a cloth, if possible. Loss of over a quart of blood may be serious, especially in young children, the aged, and debilitated.
- Direct pressure. Use a clean cloth or a part of the clothing in real emergencies. Apply direct pressure directly over the wound. After the bleeding has been controlled, apply additional layers of cloth to form a sufficient covering, then bandage snugly or firmly.
- Pressure to the supplying vessel. Use the heel of your hand to press the supplying vessel against the underlying bone. Such pressure causes the bleeding to diminish, but doesn’t stop it entirely.
Here are some other tips when dealing with all kinds of wounds:
- If an extremity is involved, elevate it, using pillows or substitutes.
- If there is a delay getting professional medical care, make sure to give the injured person plenty of water if they’re thirsty. You want to make sure they’re properly hydrated. Do not give alcoholic drinks, or give water if there is a penetrating wound of the abdomen or lower chest.
For more, consult the American Red Cross.
Read MoreGod’s Eyes
I wish I knew of a non-religious name for this craft, but this is what they’ve always been referred to as long as I’ve known how to do them. The project originates in Mexico and Bolivia and is known in Spanish as Ojo de Dios, which translates to God’s Eyes. These can be used as decoration anywhere or even ornaments for a Christmas tree during the holidays. The way I’ve written the directions, you’ll have to tie off colors to switch cleanly between them, but in the Quick Shopping links at the bottom I’ve found some multicolor skeins of yarn. These types of yarn vary throughout the skein in different colors, so that might be an interesting way to vary the color but avoid the tie off of the different colors. It’s a handy trick when you don’t have a lot of time to complete the project or when working with younger girls who might not have the patience or dexterity to tie off between colors.
Want to share photos of your troop and finished projects? Contact Us!
![]() Materials Needed:
Materials Needed:
- 2 small, straight sticks about 5″ long OR 2 craft sticks
- Scissors
- Pencil
- 1-3 skeins of yarn in various colors
![]() Directions:
Directions:
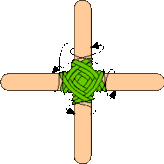
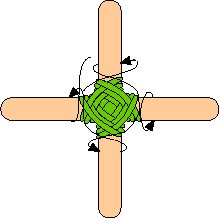
- Cross the sticks at the center. Tie them together with the end of a piece of yarn, making an X, but don’t cut the yarn off its skein. Tie the yarn IN BACK of the 2 crossed sticks.
- With the pencil, number the sticks at the ends, in the center. This isn’t necessary, but will make these directions much easier to follow.
- Bring the yarn to the front between sticks 3 and 4. Pull the yarn over stick 3 and the next one too (stick 2), and bring it to the back between sticks 2 and 1. Wrap it behind stick 2 and bring it to the front again between sticks 2 and 3. Pull it over stick 2 and the next one too (stick 1), and wrap it behind stick 1.
- Pull the yarn over stick 1 and the next one too (stick 4) and wrap it behind stick 4. Pull it over stick 4 and the next one too (stick 3) and wrap it behind stick 3. This is one complete round. Always lay the yarn next to, NOT on top of the yarn already in place.
- Keep on wrapping the yarn behind each stick, over that stick and the next, and around behind that one, then over that stick and the next and behind that one. As you continue making the rounds, always be sure that the yarn lies next to, but never on top of the yarn in the previous round. After the first few rounds, you will see the woven pattern of the “eye” beginning to form.
- When you have an “eye” in one color of yarn, you can cut the yarn and tie on another color, and continue weaving. Make sure that the knot that you joined the 2 colors with, stays in the back.
- Keep weaving the “God’s Eye” until you are about ½” from the ends of the sticks. Cut the yarn, leaving approximately a 7-8″ tail. Tie the tail in a knot in back.
This diagram from About.com should help:
![]() Safety Tips!
Safety Tips!
- This is an all-ages project, but adult supervision is required of younger girls when using the scissors.
Caring for Hypothermia
Sometimes, despite your best efforts to prevent hypothermia, symptoms can present themselves anyway, especially in small children. Remember that hypothermia is a big deal – it’s a medical emergency that requires immediate attention by a medical professional. Once you’ve identified hypothermia symptoms, call 9-1-1 or the local emergency number and follow these steps immediately.
- Get out of the water and get to a warm place.
- Remove wet clothing.
- Gradually rewarm your body by wrapping yourself in blankets or putting on dry clothes.
- Cover your head to prevent further heat loss.
- Be careful not to rewarm yourself too quickly. Rapid rewarming can cause dangerous heart rhythms.
- Drink warm nonalcoholic and decaffeinated liquids.
- If you’re caring for someone else and they are unconscious, monitor their breathing and pulse. Be prepared to give rescue breathing or CPR.
For more, read Basic Water Rescue, a booklet published by the American Red Cross.
Egg Carton Flowers
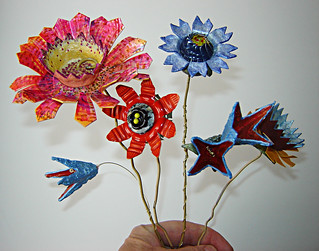 This Egg Carton Flowers craft is a great project around Easter or Mother’s Day for Brownie and Junior girls. It’s a great project for the girls to create small bouquets to give to their mothers, sisters, or anyone special to them. The colors of paint suggested make a nice light palette, but feel free to use different colors to coordinate with the holiday or season nearest to when you decide to do this project. It can be a bit messy, but can also easily be completed in a 30 minute troop meeting.
Want to share photos of your troop and finished projects? Contact Us!![]()
Materials Needed:
- Cardboard egg carton
- Acrylic Paint – Lemon Custard, Baby Pink, Parisian Pink, Jamaican Sea, Lilac Love, Bright Green
- Chenille stems, kelly green
- Pom poms, ¾”assorted colors
- Scissors
- Paintbrush
- All-purpose glue
- Paper towels
- Paper plates
- Antibacterial spray
- Clothespins
![]() Directions:
Directions:
- Cut egg cartons apart, giving you individual “egg cups” to craft with.
- Use scissors to shape flowers, cut slits and create leaves.
- Using the clothespin to hold your flower and leaves, paint as desired. Turn some of the egg cups upside down and glue to the center of another cup to create different sizes and looks.
- Combine colors and shapes. Layer flowers with 2 or more cups.
- Have an adult poke small holes in the bottom of the cups and insert the chenille stems through the hole for the stem. Twist end of stems inside the cup to hold; add glue if needed.
- Glue pom poms to center of flower.
- Glue leaf shapes to chenille stem. Let dry completely before handling.
![]() Safety Tips!
Safety Tips!
- Spray the egg cartons with antibacterial spray before using to ward off any harmful bacteria.
Identifying Hypothermia
If you’ve been unable to prevent hypothermia, there are some telltale signs for identifying hypothermia. Usually if a member of your group is complaining that they’re cold, be sure to check their temperature. If their temperature is below 96° Some of the signs to look for are:
- Confusion or sleepiness.
- Slowed, slurred speech, or shallow breathing.
- Weak pulse; low blood pressure.
- A change in behavior during cold weather or a change in the way a person looks.
- Excess shivering or no shivering; stiffness in the arms or legs.
- Poor control over body movements or slow reactions.
For more, read Basic Water Rescue, a booklet published by the American Red Cross.