Developing an Emergency Action Plan
Whenever going into the great outdoors with a troop, it’s important to develop an Emergency Action Plan, or EAP. An effective EAP must be simple, easy to remember, and in writing. Y0u should make an EAP clear for all girls, volunteers, and event staff to understand. A EAP should include these general features:
- How the person who recognizes the emergency is to signal others.
- The steps each person should take in an emergency.
- The location of rescue and safety equipment.
- Actions to minimize the emergency and safely rescue any victims.
- How to call for medical assistance when needed.
- Follow up procedures for after the emergency.
All adults should be briefed in detail what to do in case of an emergency with the troop. Depending on the age of the girls, you can brief them at the same time if they’re older and can understand the details, or you may choose to brief younger girls separately using language they can more easily understand.
When you put your EAP into writing, consider including any of the applicable following sections:
- Layout of facility/environment.
- EMS personnel access and entry/exit routes.
- Location of rescue and first aid equipment.
- Location of telephones, with emergency telephone numbers posted.
- Location of keys for buildings or rooms with telephones or emergency equipment.
- Exits and evacuation routes.
- Equipment available.
- Rescue equipment.
- First aid supplies.
- Emergency equipment, such as flashlights or fire extinguishers.
- Support personnel available.
- Internal.
- Staff members.
- Troop leaders.
- Volunteers.
- Clerical personnel.
- Maintenance personnel.
- External.
- EMS personnel.
- Police officers.
- Fire fighters.
- Hazardous materials (HazMat) team.
- Poison control center.
- Hospitals.
- Power and gas companies.
- Health department.
- Search and rescue team.
- Internal.
- Staff responsibilities.
- Assign each adult a duty:
- Provide care.
- Control bystanders and troop.
- Meet EMS personnel.
- Interview witnesses.
- Assign each adult a duty:
- Communications.
- How and when to call 9-1-1 (or other local emergency number), and who will make the call.
- Chain of command.
- Personal to contact family/parents.
- Person to deal with media.
- Follow up.
- This includes items such as EAP documentation and evaluation.
Clearly, some of these sections do not need to be included for a day trip to a public, controlled area (such as a pool or water park). They should all be included when taking an extended trip or a trip to a more remote area, like a day hike or weekend long camping trip.
For more, read Basic Water Rescue, a booklet published by the American Red Cross.
First Aid Kit for Aquatic Activities
Spring and Summer are coming soon, which means all sorts of swimming, boating, and other water-based activities to cool down under the hot sun. It’s important that every troop have a water safety kit (or two!) with them when playing in, on, or around the water. This does vary a bit from a traditional first aid kit with some specific items. For girls of all ages, this can be turned into a fun meeting activity in preparation for a water-based outing in building their own mini kits or assisting in putting together the main troop kits.
To put together smaller, personal water safety kits, buy large packages for the contents in the kit. Portion out any liquids in smaller, travel size containers.
Case
- Durable in extreme hot and cold
- Waterproof
- Sized for personal or group needs.
Contents
- Adhesive bandages, assorted sizes.
- Adhesive tape.
- Liquid soap.
- Cold packs.
- Disposable latex gloves.
- Roller gauze, assorted sizes.
- Elastic bandages.
- Scissors.
- Sterile gauze and pads, assorted sizes.
- Topical sting relief.
- Sunblock (SPF 15 or higher)
- Triangular bandages.
- Tweezers.
- Sugar packs.
- Resuscitation mask.
- Reusable plastic bags.
- First aid reference guide, such as American Red Cross’ First Aid Fast
or American Red Cross’ Sport Safety Training: Injury Prevention and Care Handbook
.
Include the following additional items in delayed-help environments
- Emergency space blanket.
- Flashlight and spare batteries.
- Nylon cord.
- Insect repellent.
- Knife.
- Water purification tablets.
- Waterproof container of matches.
- Splinting materials.
- High energy food bars.
For more, read Basic Water Rescue, a booklet published by the American Red Cross.
Water Safety Guidelines
I’ve been meaning to post more first aid tips for troops. These first aid tops are helpful for outings and to teach the girls. Older girls can practice some of these techniques to learn.
Everyone should follow safe procedures when in, on, or around the water. The following are general water safety guidelines. All aged girls should review these guidelines before any water activities, even swimming.
- Learn to swim. Learn boating, general first aid, and CPR skills. Contact your local Red Cross for information about swimming, first aid, and CPR courses.
- Check with your local Red Cross, the U.S. Coast Guard, state boating officials, and other organizations about boating courses. Take a course before engaging in any new activities on the water.
- Know what to do in case of a water emergency.
- Wear a U.S. Coast Guard-approved life jacket when around water or when boating.
- Pay attention to local weather conditions and forecasts.
- Know how to prevent accidents, recognize hazards, and care for injuries.
For more, read Basic Water Rescue, a booklet published by the American Red Cross.
Bicycle Outings & Safety Reminders
One of the best activities to get together as a troop and do is ride bikes. In any given area, whether it’s rural or urban, you should be able to do some minimal research on bike paths that are appropriate. Here are some tips for planning your bicycle riding outing.
When
Determining when to go on your bicycle riding outing greatly depends on the girls. If they’re younger girls with beginning bicycle riding skills, you will want to go riding during the day. You can schedule the ride during a meeting time if you usually meet during the day, or plan on a separate weekend outing to avoid evening rides. If the girls are older and more adept bike riders, an evening ride may be an option. Consider the maturity level of your girls and the area in which you are considering riding before making a decision whether to ride during the day or in the evening.
Where
Do some research with parents on the skill level of the girls on their bicycles. Generally speaking, if they’re younger and less skilled, you will want to research bicycle paths that are paved, exclusive for bike riders to minimize pedestrians, and as flat and straight as possible. More advanced bike riders can handle paths that are not paved, more bumpy or curved, and may have the chance of sharing the space with pedestrians. Older, more mature girls may even be able to handle more urban rides using bicycle lanes on city streets.
Once you’ve determined what kinds of skills your girls have, you can start looking for appropriate paths in your area. Even in urban areas, regional parks are usually nearby. Of course, bike transportation will have to be considered if you choose a path not close to your meeting area or neighborhood where most girls live. Regional parks are more likely to have paths or trails specifically designated for bicycles, whereas local city parks are more likely to have pedestrians sharing paths.
How
Choosing an area nearby where your meetings are normally held will increase the number of girls that can participate. This is because not every parent will have a vehicle big enough to transport a bike to a remote location or a portable bike rack for a car. Keep in mind how you are going to get the girls, their equipment, and their bicycles to the location before deciding on one.
Cost
You can decide, if doing the ride at a regional park, to charge for the outing if there is a fee to enter the park. If transportation of the bikes is an issue, you can easily rent a small moving truck or trailer for around $20 for the day. If there are girls in your troop that do not have access to their own bicycles, you can look for spare bicycles from other families willing to loan them out or consider renting them. Some areas with bicycle paths also have independent vendors that rent bicycles for nominal fees.
Preparation
Schedule the activity enough in advance for parents to make plans to get bicycles checked out and in working order, or purchase a new bicycle for their daughter and make sure she has a helmet. Planning a month in advance will give you time to make your arrangements and send out permission slips about two weeks before the scheduled date. If you decide to charge for the event, be sure to add an extra week as a courtesy for parents. Let them know what the cost is covering (i.e. park entry, transportation, parking, maybe a lunch or souvenir, etc). Be sure to make calls to the parents in addition to sending notes home if the girls are younger and prone to forgetting.
Parents also need time to register the bikes, just in case something happens. Usually the local fire station will accept bicycle registrations for a nominal fee, or you can go to National Bike Registry and do it online. $10 will cover registration for 10 years.
At least one meeting before the scheduled outing, review bike safety and proper bike riding etiquette with the girls. To make it fun you can build in a small quiz and prizes. For younger girls, tying in a craft project making their own bike licenses or safety certificates using construction paper and markers or glitter will also make it fun and keep it in the forefront of their minds.
 Safety
Remember the girls’ safety is YOUR responsibility. Be sure to brush up on these safety tips and review bicycle safety the meeting before your outing so the girls are best prepared.
- Stop at all stop signs and obey traffic lights just as cars do. Yield to pedestrians, stop at red lights, and be especially careful at intersections.
- Always ride in the same direction as cars do. Never ride against traffic.
- Always wear a helmet, even adults. Some states don’t require adults over age 18 to wear a helmet, however you should wear as a good example.
- A safety check should always be done on the bicycles before riding. All bicycles should have their brakes in proper working order with reflectors on the front, rear, and on the wheels.
- If you’re planning on riding in the evening or at night, bicycles should be equipped with a light on the front and rear of the bicycle. Girls should also wear a reflective vest or light colored clothing.
- Remember your bicycle hand signals:
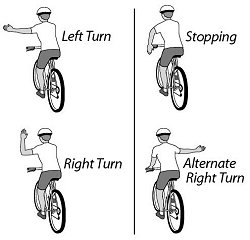
Bike Hand Signals
- When riding on a path also being used by pedestrians, be aware of how close you are getting to groups and identify yourself as a bike rider.
- When passing other bikers or people on the street, always pass to their left and call out “On your left!” so they’ll watch for you.
- Never share the seat with a friend or ride on the handlebars — only one person should be on a bike at a time. It’s easy to lose balance or suddenly swerve into traffic when riding with a passenger.
- When encountering a large group of pedestrians, it’s best to pull to the side and get off of the bicycle and walk past.
- If riding on the sidewalk, get off and walk your bicycle across the street, staying in the cross walk.
- At least one person traveling with your group should know how to fix a flat tire and carry a flat tire fix kit and portable tire pump.
- At least one adult should lead the group and another should bring up the rear, with other available adults dispersed through the group.
- Girls should always wear pants or shorts when riding. Pants should be fairly tight at the ankle or able to be folded up or secured above the knee on the side of the gears if there is no gear guard. Special bands can be purchase from bicycle or sporting goods shops to secure pant legs from getting caught in the gears. In a pinch, masking tape can be used.
Leaves of Three, Beware of Me!
This is a handy way to avoid most poisonous plants when camping and hiking. And remember that poison oak and poison ivy are located even in some relatively urban areas.
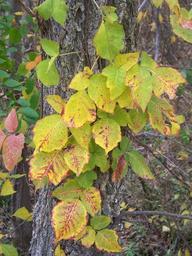
According to the American Academy of Dermatology, the saying “leaves of three, beware of me” can help identify poison ivy and oak, a more accurate saying is “leaflets of three, beware of me.” Each leaf on poison ivy and poison oak has three smaller leaflets. The middle leaflet has a longer stalk than the two on the sides.
Contact with a poisonous plant can lead to a nasty, itchy rash. The best way to limit the spread to fellow campers is to isolate the clothing you were wearing at the time in a garbage bag and shower immediately. A bath will just move the oils that cause the rash around and spread it to other parts of your body, so a shower is preferred. This won’t prevent a rash if you’ve had significant contact, but will help prevent the spread to others.
Treatment of a mild case can be solved with a cool shower and some over-the-counter medicine like Tecnu, Caldryl Clear or other itch relief lotion. An oatmeal bath can also sooth the itch. More advanced cases can require a trip to a doctor and a prescription medication to reduce the itching and swelling.