Posts Tagged "construction paper"
Pinwheels
This is a great project for younger girls, as the pinwheels work pretty well but older girls might be a bit disappointed that they don’t work perfectly but they’re still awesome! That doesn’t really matter since, in my experience, pinwheels are really a toy more suited for younger girls anyway. You can spice up the project and colors by getting a pack of assorted colored drinking straws instead of plain white ones. The best straws are straight and not the kind with the bend in them.
Want to share photos of your troop and finished projects? Contact Us!
![]() Materials Needed:
Materials Needed:
- White construction paper
- Crayons, colored pencils, or markers.
- Plastic drinking straws
- Scissors
- Pencils
- Brass paper fasteners
- Pinwheel pattern.
![]() Directions:
Directions:
- Print the pinwheel pattern. You can reproduce this pattern on white construction paper with a copy machine. Be sure to cut the construction paper to 8½ in. by 11 in. You can also print the pattern out onto thicker colored paper directly.
- Cut out the pattern along the solid lines.
- Decorate the un-folded paper. Stickers might not work so well due to the folding and aerodynamics, but any other crayons, colored pencils, or markers should be fine for decorations.
- Cut the dotted lines from the four corners to the center circle, doing your best not to cut into the center circle.
- Use the sharpened pencil to poke a hole through the four tiny dark circles. The pencil point also works well to poke a hole into the straw, though you can also have an adult use a nail or a very small diameter hole punch. Carefully push the pencil point through the straw about ½” inch from the top.
- Make the tiny holes on the four points meet at the center circle.
- Push the brass fastener ends through the holes on the pinwheel. then push the fastener through the center circle.
- Place the straw on the back side of your pinwheel and push the ends of the fastener through the hole in the straw. Open-up the fastener by flattening the ends in opposite directions.
![]() Safety Tips!
Safety Tips!
- Adults should always make the holes when using a sharp object and working with younger girls.
- DO NOT allow the girls to punch holes with a nail if that’s the only implement you have.
- Adult supervision required when younger girls are using scissors.
![]() Quick Shopping for This Project
Quick Shopping for This Project
- Pacon Corporation Tru-Ray Construction Paper 9″x12″ White
- Crayola® Crayons – 64 Ct.
- Crayola® Classic Broadline Markers – 10 ct.
- Crayola Colored Pencils – 64ct.
- ACCO(R) Round-Head Solid Brass Fasteners, No. 4R, 1in., Box Of 100
- Drinking Straws
- Fiskars Creative Works Comfort Grip 7″ Scissors
Bicycle Outings & Safety Reminders
One of the best activities to get together as a troop and do is ride bikes. In any given area, whether it’s rural or urban, you should be able to do some minimal research on bike paths that are appropriate. Here are some tips for planning your bicycle riding outing.
When
Determining when to go on your bicycle riding outing greatly depends on the girls. If they’re younger girls with beginning bicycle riding skills, you will want to go riding during the day. You can schedule the ride during a meeting time if you usually meet during the day, or plan on a separate weekend outing to avoid evening rides. If the girls are older and more adept bike riders, an evening ride may be an option. Consider the maturity level of your girls and the area in which you are considering riding before making a decision whether to ride during the day or in the evening.
Where
Do some research with parents on the skill level of the girls on their bicycles. Generally speaking, if they’re younger and less skilled, you will want to research bicycle paths that are paved, exclusive for bike riders to minimize pedestrians, and as flat and straight as possible. More advanced bike riders can handle paths that are not paved, more bumpy or curved, and may have the chance of sharing the space with pedestrians. Older, more mature girls may even be able to handle more urban rides using bicycle lanes on city streets.
Once you’ve determined what kinds of skills your girls have, you can start looking for appropriate paths in your area. Even in urban areas, regional parks are usually nearby. Of course, bike transportation will have to be considered if you choose a path not close to your meeting area or neighborhood where most girls live. Regional parks are more likely to have paths or trails specifically designated for bicycles, whereas local city parks are more likely to have pedestrians sharing paths.
How
Choosing an area nearby where your meetings are normally held will increase the number of girls that can participate. This is because not every parent will have a vehicle big enough to transport a bike to a remote location or a portable bike rack for a car. Keep in mind how you are going to get the girls, their equipment, and their bicycles to the location before deciding on one.
Cost
You can decide, if doing the ride at a regional park, to charge for the outing if there is a fee to enter the park. If transportation of the bikes is an issue, you can easily rent a small moving truck or trailer for around $20 for the day. If there are girls in your troop that do not have access to their own bicycles, you can look for spare bicycles from other families willing to loan them out or consider renting them. Some areas with bicycle paths also have independent vendors that rent bicycles for nominal fees.
Preparation
Schedule the activity enough in advance for parents to make plans to get bicycles checked out and in working order, or purchase a new bicycle for their daughter and make sure she has a helmet. Planning a month in advance will give you time to make your arrangements and send out permission slips about two weeks before the scheduled date. If you decide to charge for the event, be sure to add an extra week as a courtesy for parents. Let them know what the cost is covering (i.e. park entry, transportation, parking, maybe a lunch or souvenir, etc). Be sure to make calls to the parents in addition to sending notes home if the girls are younger and prone to forgetting.
Parents also need time to register the bikes, just in case something happens. Usually the local fire station will accept bicycle registrations for a nominal fee, or you can go to National Bike Registry and do it online. $10 will cover registration for 10 years.
At least one meeting before the scheduled outing, review bike safety and proper bike riding etiquette with the girls. To make it fun you can build in a small quiz and prizes. For younger girls, tying in a craft project making their own bike licenses or safety certificates using construction paper and markers or glitter will also make it fun and keep it in the forefront of their minds.
 Safety
Remember the girls’ safety is YOUR responsibility. Be sure to brush up on these safety tips and review bicycle safety the meeting before your outing so the girls are best prepared.
- Stop at all stop signs and obey traffic lights just as cars do. Yield to pedestrians, stop at red lights, and be especially careful at intersections.
- Always ride in the same direction as cars do. Never ride against traffic.
- Always wear a helmet, even adults. Some states don’t require adults over age 18 to wear a helmet, however you should wear as a good example.
- A safety check should always be done on the bicycles before riding. All bicycles should have their brakes in proper working order with reflectors on the front, rear, and on the wheels.
- If you’re planning on riding in the evening or at night, bicycles should be equipped with a light on the front and rear of the bicycle. Girls should also wear a reflective vest or light colored clothing.
- Remember your bicycle hand signals:
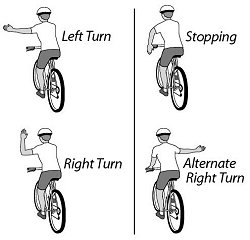
Bike Hand Signals
- When riding on a path also being used by pedestrians, be aware of how close you are getting to groups and identify yourself as a bike rider.
- When passing other bikers or people on the street, always pass to their left and call out “On your left!” so they’ll watch for you.
- Never share the seat with a friend or ride on the handlebars — only one person should be on a bike at a time. It’s easy to lose balance or suddenly swerve into traffic when riding with a passenger.
- When encountering a large group of pedestrians, it’s best to pull to the side and get off of the bicycle and walk past.
- If riding on the sidewalk, get off and walk your bicycle across the street, staying in the cross walk.
- At least one person traveling with your group should know how to fix a flat tire and carry a flat tire fix kit and portable tire pump.
- At least one adult should lead the group and another should bring up the rear, with other available adults dispersed through the group.
- Girls should always wear pants or shorts when riding. Pants should be fairly tight at the ankle or able to be folded up or secured above the knee on the side of the gears if there is no gear guard. Special bands can be purchase from bicycle or sporting goods shops to secure pant legs from getting caught in the gears. In a pinch, masking tape can be used.