Bicycle Outings & Safety Reminders
One of the best activities to get together as a troop and do is ride bikes. In any given area, whether it’s rural or urban, you should be able to do some minimal research on bike paths that are appropriate. Here are some tips for planning your bicycle riding outing.
When
Determining when to go on your bicycle riding outing greatly depends on the girls. If they’re younger girls with beginning bicycle riding skills, you will want to go riding during the day. You can schedule the ride during a meeting time if you usually meet during the day, or plan on a separate weekend outing to avoid evening rides. If the girls are older and more adept bike riders, an evening ride may be an option. Consider the maturity level of your girls and the area in which you are considering riding before making a decision whether to ride during the day or in the evening.
Where
Do some research with parents on the skill level of the girls on their bicycles. Generally speaking, if they’re younger and less skilled, you will want to research bicycle paths that are paved, exclusive for bike riders to minimize pedestrians, and as flat and straight as possible. More advanced bike riders can handle paths that are not paved, more bumpy or curved, and may have the chance of sharing the space with pedestrians. Older, more mature girls may even be able to handle more urban rides using bicycle lanes on city streets.
Once you’ve determined what kinds of skills your girls have, you can start looking for appropriate paths in your area. Even in urban areas, regional parks are usually nearby. Of course, bike transportation will have to be considered if you choose a path not close to your meeting area or neighborhood where most girls live. Regional parks are more likely to have paths or trails specifically designated for bicycles, whereas local city parks are more likely to have pedestrians sharing paths.
How
Choosing an area nearby where your meetings are normally held will increase the number of girls that can participate. This is because not every parent will have a vehicle big enough to transport a bike to a remote location or a portable bike rack for a car. Keep in mind how you are going to get the girls, their equipment, and their bicycles to the location before deciding on one.
Cost
You can decide, if doing the ride at a regional park, to charge for the outing if there is a fee to enter the park. If transportation of the bikes is an issue, you can easily rent a small moving truck or trailer for around $20 for the day. If there are girls in your troop that do not have access to their own bicycles, you can look for spare bicycles from other families willing to loan them out or consider renting them. Some areas with bicycle paths also have independent vendors that rent bicycles for nominal fees.
Preparation
Schedule the activity enough in advance for parents to make plans to get bicycles checked out and in working order, or purchase a new bicycle for their daughter and make sure she has a helmet. Planning a month in advance will give you time to make your arrangements and send out permission slips about two weeks before the scheduled date. If you decide to charge for the event, be sure to add an extra week as a courtesy for parents. Let them know what the cost is covering (i.e. park entry, transportation, parking, maybe a lunch or souvenir, etc). Be sure to make calls to the parents in addition to sending notes home if the girls are younger and prone to forgetting.
Parents also need time to register the bikes, just in case something happens. Usually the local fire station will accept bicycle registrations for a nominal fee, or you can go to National Bike Registry and do it online. $10 will cover registration for 10 years.
At least one meeting before the scheduled outing, review bike safety and proper bike riding etiquette with the girls. To make it fun you can build in a small quiz and prizes. For younger girls, tying in a craft project making their own bike licenses or safety certificates using construction paper and markers or glitter will also make it fun and keep it in the forefront of their minds.
 Safety
Remember the girls’ safety is YOUR responsibility. Be sure to brush up on these safety tips and review bicycle safety the meeting before your outing so the girls are best prepared.
- Stop at all stop signs and obey traffic lights just as cars do. Yield to pedestrians, stop at red lights, and be especially careful at intersections.
- Always ride in the same direction as cars do. Never ride against traffic.
- Always wear a helmet, even adults. Some states don’t require adults over age 18 to wear a helmet, however you should wear as a good example.
- A safety check should always be done on the bicycles before riding. All bicycles should have their brakes in proper working order with reflectors on the front, rear, and on the wheels.
- If you’re planning on riding in the evening or at night, bicycles should be equipped with a light on the front and rear of the bicycle. Girls should also wear a reflective vest or light colored clothing.
- Remember your bicycle hand signals:
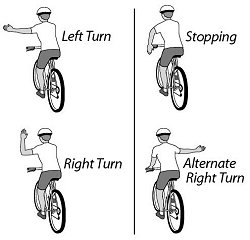
Bike Hand Signals
- When riding on a path also being used by pedestrians, be aware of how close you are getting to groups and identify yourself as a bike rider.
- When passing other bikers or people on the street, always pass to their left and call out “On your left!” so they’ll watch for you.
- Never share the seat with a friend or ride on the handlebars — only one person should be on a bike at a time. It’s easy to lose balance or suddenly swerve into traffic when riding with a passenger.
- When encountering a large group of pedestrians, it’s best to pull to the side and get off of the bicycle and walk past.
- If riding on the sidewalk, get off and walk your bicycle across the street, staying in the cross walk.
- At least one person traveling with your group should know how to fix a flat tire and carry a flat tire fix kit and portable tire pump.
- At least one adult should lead the group and another should bring up the rear, with other available adults dispersed through the group.
- Girls should always wear pants or shorts when riding. Pants should be fairly tight at the ankle or able to be folded up or secured above the knee on the side of the gears if there is no gear guard. Special bands can be purchase from bicycle or sporting goods shops to secure pant legs from getting caught in the gears. In a pinch, masking tape can be used.
Dipped Candles
I remember making dip candles for as long as I can remember. Whether at a summer troop meeting or most often at camp, dip candles were a welcome craft that I loved. It’s a remarkably easy process that even the younger girls can do with some supervision. All materials are available at your local craft store and are relatively inexpensive. You can even substitute the wax with old broken crayons, though they do have a distinct smell to them.
Remember that many times these candles are not intended for practical use – the girls put a lot of time into dipping them in the different colors to make creative layers and shapes. These are best kept on a shelf and dusted off once in a while as a camp keepsake!
![]() Materials Needed:
Materials Needed:
- ½ lb. paraffin wax, plain
- Old wooden spoon (don’t plan on using it with food again)
- metal coffee cans (one for each color you plan to make)
- a pot full of water large enough to hold the coffee cans (you’re making a double boiler, here)
- A heat source – this can be your stove, a camp stove, or portable burners.
- wicks, your choice of length (1″ of wick makes about a 1″ candle)
- coloring chips (you can use color chips or liquids bought at your craft store or use old crayons with the papers removed)
![]() Directions:
Directions:
- Most of the time the plain paraffin wax comes in blocks, so chop it up into smaller pieces (about 1″) for faster, easier melting.
- Fill the pot with water and heat on medium to a gentle boil.
- Place the wax into the coffee can and carefully insert it into the water.
- Stir the wax until it is completely melted. If you have a thermometer, the temperature should be 160°F.
- Turn the heat down; keep the water warm enough to keep the wax melted and about the same temperature.
- Add the coloring a little at a time until you’ve reached the shade of the color you want. You want the melted wax to be a shade darker than your final result because it will lighten up a little when it’s dry.
- Repeat steps 1-6 simultaneously if you want to prepare different colors.
- While an adult has been preparing steps 1-6, the younger girls can be cutting their wicks to the desired lenghts. There are metal discs you can buy in the candle aisle at the craft store to start the candles on, or you can just tie a small knot into the bottom end of the candle.
- Be sure to leave an extra inch on the wick for extra finger space to hold while dipping. The excess can be cut off once the candle cools.
- To start the candle, dip the wick in the wax for a few seconds to build it up around the knot.
- Continue dipping the wick into the wax until you’ve built up your desired candle. Leave at least 30 seconds in between dips for the wax to begin drying, or else you’ll end up dipping for a long time and just remelting the same layer.
- Once your candle is done but still warm, an adult can take a sharp knife and cut off the bottom to create a level sitting surface for the candle. Another technique is to set the candle on a flat surface and mold the still warm wax slightly to form a base.
- Set the candles aside to dry and set for a few hours. If this activity is done at camp, it’s best to let the girls have them later in the afternoon or the next day. If done at a troop meeting, you can either give the warm candles to the parents who pick them up to continue drying or pack them up carefully and give the finished candles to the girls at the next troop meeting.
![]() Safety Tips!
Safety Tips!
- Never leave the girls unattended with the hot wax or sharp knife.
- Never leave the hot wax alone.
- Do not heat the wax above 275°F.
- Never let wax come in contact with flames. If you develop a wax fire, treat it as you would a grease fire. Do not throw water on it. Use a fire extinguisher (type ABC) or if it is contained in a pan, cover with a lid, extinguish any heat source and leave the lid in place until the area has cooled.
- Always use the double boiler water method to reduce the risk of wax fires.
- Remember to replenish the water in the pot as it evaporates keeping the wax melted.
- Do not pour the wax down the drain; it will block them.
Remember that the wax can be reused for candles at another time – that’s the beauty of using old coffee cans instead of pots for the double boiler. Just let the wax cool and dry inside and set them aside where children can’t get to them. The next time you’re ready for candle making, use an old chisel or ice pick and chop up the wax in the can for easier remelting.
Another great method that I learned once at camp is making ice candles, but we’ll leave that for another time 🙂
![]() Quick Shopping for This Project
Quick Shopping for This Project
Easy Ice Cream in a Can
This is an easy summer time activity for troop meetings, camping trips, or long summer afternoons! Of course, there are easier ways for making ice cream, and an outing as a troop to a local ice cream store can be fun as well. Prepare a week ahead of time and ask them to get the cans from their parents and be prepared to bring extras. Not all parents drink coffee!
Materials Needed:
- 2 clean metal cans, both with lids (make one can larger than the second)
- 1 c. very cold milk
- 1 c. sugar
- 1 tsp vanilla
- 1 tsbp chocolate syrup
- ice
- salt
Directions:
- Place the ice cream mixture into the smaller can (be SURE the can is clean!) and seal the lid securely.
- Place the smaller can into the center of the larger can and surround it with ice and salt, keeping it as centered as possible.
- Seal the lid of the larger can tightly and roll it around for about 30 minutes.
That’s it! Let the girls roll it around between them or make a game out of it. The payoff of the ice cream will be well worth it! You can add to the craft preparation of it by letting the girls decorate the cans before hand. That way they can take home their own cans of ice cream!
Read MoreThe Girl Scout Promise
To be said at every meeting’s opening and the opening of badge ceremonies:
On my honor, I will try:
To serve God* and my country,
To help people at all times,
And to live by the Girl Scout Law.