Posts Tagged "yarn"
God’s Eyes
I wish I knew of a non-religious name for this craft, but this is what they’ve always been referred to as long as I’ve known how to do them. The project originates in Mexico and Bolivia and is known in Spanish as Ojo de Dios, which translates to God’s Eyes. These can be used as decoration anywhere or even ornaments for a Christmas tree during the holidays. The way I’ve written the directions, you’ll have to tie off colors to switch cleanly between them, but in the Quick Shopping links at the bottom I’ve found some multicolor skeins of yarn. These types of yarn vary throughout the skein in different colors, so that might be an interesting way to vary the color but avoid the tie off of the different colors. It’s a handy trick when you don’t have a lot of time to complete the project or when working with younger girls who might not have the patience or dexterity to tie off between colors.
Want to share photos of your troop and finished projects? Contact Us!
![]() Materials Needed:
Materials Needed:
- 2 small, straight sticks about 5″ long OR 2 craft sticks
- Scissors
- Pencil
- 1-3 skeins of yarn in various colors
![]() Directions:
Directions:
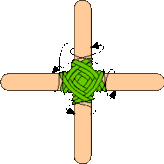
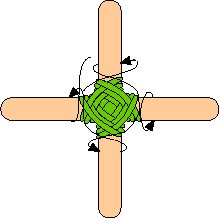
- Cross the sticks at the center. Tie them together with the end of a piece of yarn, making an X, but don’t cut the yarn off its skein. Tie the yarn IN BACK of the 2 crossed sticks.
- With the pencil, number the sticks at the ends, in the center. This isn’t necessary, but will make these directions much easier to follow.
- Bring the yarn to the front between sticks 3 and 4. Pull the yarn over stick 3 and the next one too (stick 2), and bring it to the back between sticks 2 and 1. Wrap it behind stick 2 and bring it to the front again between sticks 2 and 3. Pull it over stick 2 and the next one too (stick 1), and wrap it behind stick 1.
- Pull the yarn over stick 1 and the next one too (stick 4) and wrap it behind stick 4. Pull it over stick 4 and the next one too (stick 3) and wrap it behind stick 3. This is one complete round. Always lay the yarn next to, NOT on top of the yarn already in place.
- Keep on wrapping the yarn behind each stick, over that stick and the next, and around behind that one, then over that stick and the next and behind that one. As you continue making the rounds, always be sure that the yarn lies next to, but never on top of the yarn in the previous round. After the first few rounds, you will see the woven pattern of the “eye” beginning to form.
- When you have an “eye” in one color of yarn, you can cut the yarn and tie on another color, and continue weaving. Make sure that the knot that you joined the 2 colors with, stays in the back.
- Keep weaving the “God’s Eye” until you are about ½” from the ends of the sticks. Cut the yarn, leaving approximately a 7-8″ tail. Tie the tail in a knot in back.
This diagram from About.com should help:
![]() Safety Tips!
Safety Tips!
- This is an all-ages project, but adult supervision is required of younger girls when using the scissors.
Trick or Treat Yarn Wreath
This Trick or Treat Yarn Wreath is a super easy project for younger girls and just in time for Halloween. The colors of yarn chosen can easily be changed to fit any holiday or theme, so feel free to adapt the colors!
![]() Materials Needed:
Materials Needed:
- Black yarn
- Orange yarn
- Wire coat hanger
- Pliers
- 4″ wide cardboard
- Scissors
- 1½” wide ribbon
- Purchased Halloween decorations, assorted
- Fine wire
- Hot glue gun
- Hot glue sticks
![]() Directions:
Directions:
- With pliers, shape hanger into circle, then bend hook for the hanging loop.
- Wind yarn 20 times around the cardboard. Slip these strands off the cardboard. With a separate 8″ strand of yarn, tie strands together at center (see Figure 1); do not cut the yarn loops.
- Using the ends of the 8″ strand, tie the bundle to the ring, positioning the bundle perpendicular to the wire (see Figure 2). If necessary, trim off the ends of the 8″ strand.
- Make another bundle and tie to the ring adjacent to the previous bundle. Continue to make bundles and tie them to the wire in the same way, positioning each bundle against the previous bundle and working around the ring until the entire wire circle is filled.
- Make a bow from the ribbon. Wind yarn or fine wire through an area that can be hidden and tie or twist around wire ring. With hot glue, attach smaller decorations.
![]() Safety Tips!
Safety Tips!
- Always supervise young girls when using the hot glue gun.
Here are the figures I referred to above:

Read More