Posts Tagged "t-shirts"
Tie Dye Shirts

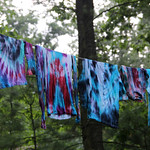 This was one of the most fun projects we did at summer camp. Yes, it’s messy but tie dye shirts are a great project that girls of all ages can enjoy – and enjoy wearing! If you’re doing this for a camp, you should include a white shirt specially for crafts on the packing list. To boot, Tie Dye Shirts make for a great souvenir to bring home from camp. For a troop activity, you can either buy the t-shirts for your girls or send home a request for them to send an old white or really light colored t-shirt for the project.
Want to share photos of your troop and finished projects? Contact Us!
![]() Materials Needed:
Materials Needed:
- Tulip One-Step Tie Dye Kit Rainbow
- White t-shirt
- Rubber bands
- Plastic gloves
- Plastic tablecloth
- Scissors
![]() Directions:
Directions:
- Wash the t-shirt in a clothes washer to remove sizing.
- Cover your work surface with the plastic tablecloth.
- Place the damp shirt on your prepared surface and smooth flat. To create a traditional bulls-eye design, pinch the front of the shirt just above the center then lift fabric up and scrunch fabric into a tube shape. Wrap a rubber band about 2″ from the tip, wrapping several times until tight. Repeat every 2″ or so along the entire shirt.
- Wearing gloves from the dye box, fill a dye bottle halfway with water. Replace the cap and shake until all the dye is thoroughly mixed. Remove the lid, add more water to the line indicated on bottle, and replace the cap and shake to mix.
- Carefully squeeze one color of dye on tip, turning shirt until entire tip has dye.
- Squeeze another color dye around center of next section, letting it bleed toward rubber bands. Insert tip of bottle into folds and squeeze more dye as needed.
- Avoid squeezing the dye too close to the rubber bands so you can leave white rings between the colors. Rotate through the colors available in the kit evenly.
- Let the dye set 4-6 hours. Use scissors to carefully cut off the rubber bands.
- Fill a clothes washer to a full load setting with a small amount of laundry soap. Once agitation strts, insert the t-shirt. Dry in clothes dryer or line dry.
![]() Safety Tips!
Safety Tips!
- Adult supervision is required when using the dye.
- Adults should cut off the rubber bands when working with younger girls.
Gobble Gobble T-Shirts
 Gobble Gobble T-Shirts are great crafts around Thanksgiving. As well, this craft can very easily be done while teaching the girls more about the origins of American Thanksgiving and the importance of tradition and family. If t-shirts are a little outside the budget for your troop during this down economy, you can change the medium to poster board and make the same design on posters for decorations during Thanksgiving.
![]() Materials Needed:
Materials Needed:
- White t-shirt – pre-washed
- Fabric paint (nontoxic): red, gold, green, orange, brown, and white
- Alphabet foam stickers
- T-shirt board or wax paper
- Paper plate or pallet paper
- Paper towels
- Sponge brush
![]() Directions:
Directions:
- Place the t-shirt board inside of the t-shirt.
- Use the sponge brush to place paint colors on the girl’s hand and fingers.
- Have the girl steadily place her hand on the shirt to print the turkey, pressing gently on each finger to make sure the paint prints. You may need to hold her hand to help keep the print from smearing.
- Carefully lift her hand straight up off the shirt to avoid smudging. Immediately wash her hands with soap and water.
- Brush red paint on foam alphabet stamps and press on shirt and let dry.
- Use fabric paint to add detail to turkey, such as legs, beak and eye and let dry.
![]() Safety Tips!
Safety Tips!
- Adult supervision is required at all times.
- Ensure that all paint is dry before you let the girls take their t-shirts home.
- Double check that all paints used are nontoxic.
Remember that if you don’t have a t-shirt board, you can place a sheet of wax paper inside the shirt to prevent transfer of the paint.
Read More