Posts Tagged "felt"
Woven Placemats
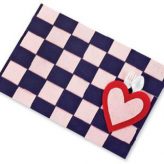
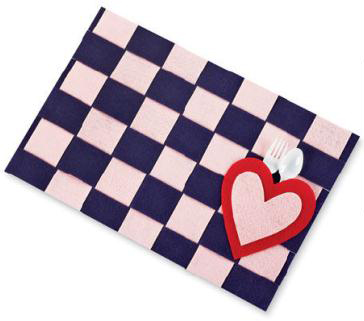 These quick woven felt placemats are an easy craft that can even be done multiple times per year. These can be decorated with different colors and designs, not just hearts for Valentine’s Day, but Thanksgiving, Christmas, St. Patrick’s Day, and more!
Want to share photos of your troop and finished projects? Contact Us!
![]() Materials Needed:
Materials Needed:
- Scissors
- Ruler
- 2 Pink felt sheets
- 1 Purple felt sheet
- 1 Red felt sheet
- Aleene’s Original Tacky Glue
- Sponge
- Chalk

![]() Directions:
Directions:
- Start with a sheet of purple felt. Fold it in half.
- While the felt is still folded, draw a series of lines across the fold about 2″ apart. Do not draw them all the way to the edge – leave about ½” at the edge.
- Use chalk and the ruler to draw the lines before cutting the felt. Use a damp sponge afterward to wipe off the chalk once the mat is put together.
- Starting on the folded end of the felt, cut along all the lines. When you unfold the piece of felt, there should be ½” border that is uncut.
- Using a sheet of pink felt, cut strips about 2″ wide that are as long as the width of the purple felt.
- Lay the purple felt on a table so it’s lengthwise. Starting on the upper left corner, help the girls weave a pink strip down through the first slit, up through the second, down through the third, and so on through all the slits.
- Weave the second strip of pink through the purple so it alternates from the first strip. Make sure that each new piece of felt is pushed up next to the previously woven piece.
- Continue weaving strips in this way until there’s no room for any more strips.
- When you’re done weaving, secure each strip of woven felt using glue. You might also have to trim the woven edges a bit to make the edges of the place mat even.
- Trace a heart onto the red felt, and then a smaller heart onto the pink felt, trying to keep the same basic shape of the heart. Cut out the pieces. Only glue the edge of the “v” of the larger heart onto the mat as shown. This will leave a pocket to hold the silverware. Glue the smaller heart onto the larger heart. Let dry before using your woven placemats!
![]() Safety Tips!
Safety Tips!
- Adult supervision is required at all times.
- Adults should handle the scissors and cutting when working with younger girls.
Felt Change Purse
This Felt Change Purse is a fun project for Junior and Cadette scouts who are older than the interest of most craft projects, and old enough to be trusted with a needle. This project takes 1-2 hours to do, depending on how adept the girls are with a needle and thread. Of course, you can split this into two meetings with doing the cutting & prep work in one meeting and the actual assembly of the purses in another. There’s a great video on how to do the blanket stitch mentioned:
Want to share photos of your troop and finished projects? Contact Us!
![]() Materials Needed:
Materials Needed:
- Floss #907
- Large eye needle
- Felt – black, purple, turquoise, gold, & pink
- 1″ sticky velcro
- 2 daisy brads
- Tacky glue
- Straight pins
- Fabric die cut machine
- Scissors
![]() Directions:
Directions:
- Cut black felt square in half to 6×9″.
- Fold up 3¾” and pin in place.
- Thread needle with floss & use blanket stitch to stitch up sides.
- Fold down flap 1¼”, press with finger to crease.
- Center sticky Velcro under flap & attach to purse & flap.
- Use Revolution to cut out flowers & leaves from felt.
- Attach with tacky glue and daisy brads.
![]() Safety Tips!
Safety Tips!
- Adult supervision is required when girls are using scissors and needles.