Posts Tagged "Dixie"
Stadium Pillows
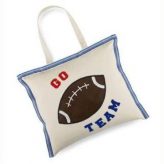
 Stadium pillows are a fantastic project for any troop of any age. While my directions mention a football design, you can customize it for any sport and use any combination of colors to represent either professional, local teams or the girls’ school colors. The project is designed to be glued together, but if your girls are older you could easily alter the directions to sew the seams of the stadium pillows instead of glue.
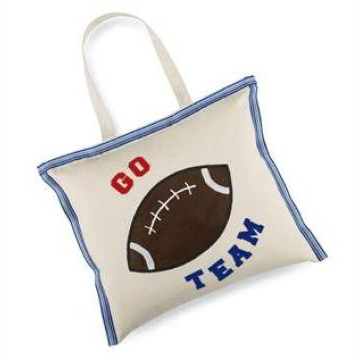
Want to share photos of your troop and finished projects? Contact Us!
![]() Materials Needed:
Materials Needed:
- Large white tote bag
- Iron on letters in team colors
- Tulip Dimensional Fabric Paint – Slick White and Slick Brown
- Black fabric marker
- Ribbon of choice in team colors
- Poly-fil or pillow form
- All-Purpose glue
- Iron
- Scissors
- Pencils
- Paintbrush
- Paper Towels
- Paper Plate

![]() Directions:
Directions:
- Reference this post from Scrapbooking.About.com for a football pattern.
- Cut the tote bag along the side to open.
- Cut one handle from the bag.
- Draw a football with the pencil in center of tote.
- Have an adult follow the directions on the letters and iron the letters onto the tote to say “Go Team”.
- Pour out a small amount of the brown and white paints onto a paper plate. Use a paintbrush to fill in the football design and let dry. Use white to make side and center lines.
- Using white slick paint bottle, draw stitch marks on the ball. Let dry.
- Glue sides of tote together, let dry.
- Fill opening with pillow form or Poly-fil and glue closed.
- Glue ribbon along sides and top of tote.
![]() Safety Tips!
Safety Tips!
- Adults only should handle the iron and iron on the lettering.
- Adult supervision is required.
Pinwheels
This is a great project for younger girls, as the pinwheels work pretty well but older girls might be a bit disappointed that they don’t work perfectly but they’re still awesome! That doesn’t really matter since, in my experience, pinwheels are really a toy more suited for younger girls anyway. You can spice up the project and colors by getting a pack of assorted colored drinking straws instead of plain white ones. The best straws are straight and not the kind with the bend in them.
Want to share photos of your troop and finished projects? Contact Us!
![]() Materials Needed:
Materials Needed:
- White construction paper
- Crayons, colored pencils, or markers.
- Plastic drinking straws
- Scissors
- Pencils
- Brass paper fasteners
- Pinwheel pattern.
![]() Directions:
Directions:
- Print the pinwheel pattern. You can reproduce this pattern on white construction paper with a copy machine. Be sure to cut the construction paper to 8½ in. by 11 in. You can also print the pattern out onto thicker colored paper directly.
- Cut out the pattern along the solid lines.
- Decorate the un-folded paper. Stickers might not work so well due to the folding and aerodynamics, but any other crayons, colored pencils, or markers should be fine for decorations.
- Cut the dotted lines from the four corners to the center circle, doing your best not to cut into the center circle.
- Use the sharpened pencil to poke a hole through the four tiny dark circles. The pencil point also works well to poke a hole into the straw, though you can also have an adult use a nail or a very small diameter hole punch. Carefully push the pencil point through the straw about ½” inch from the top.
- Make the tiny holes on the four points meet at the center circle.
- Push the brass fastener ends through the holes on the pinwheel. then push the fastener through the center circle.
- Place the straw on the back side of your pinwheel and push the ends of the fastener through the hole in the straw. Open-up the fastener by flattening the ends in opposite directions.
![]() Safety Tips!
Safety Tips!
- Adults should always make the holes when using a sharp object and working with younger girls.
- DO NOT allow the girls to punch holes with a nail if that’s the only implement you have.
- Adult supervision required when younger girls are using scissors.
![]() Quick Shopping for This Project
Quick Shopping for This Project
- Pacon Corporation Tru-Ray Construction Paper 9″x12″ White
- Crayola® Crayons – 64 Ct.
- Crayola® Classic Broadline Markers – 10 ct.
- Crayola Colored Pencils – 64ct.
- ACCO(R) Round-Head Solid Brass Fasteners, No. 4R, 1in., Box Of 100
- Drinking Straws
- Fiskars Creative Works Comfort Grip 7″ Scissors
Egg Carton Flowers
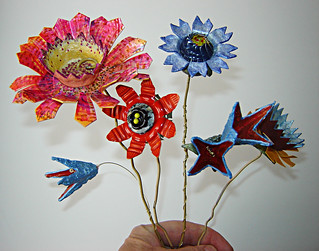 This Egg Carton Flowers craft is a great project around Easter or Mother’s Day for Brownie and Junior girls. It’s a great project for the girls to create small bouquets to give to their mothers, sisters, or anyone special to them. The colors of paint suggested make a nice light palette, but feel free to use different colors to coordinate with the holiday or season nearest to when you decide to do this project. It can be a bit messy, but can also easily be completed in a 30 minute troop meeting.
Want to share photos of your troop and finished projects? Contact Us!![]()
Materials Needed:
- Cardboard egg carton
- Acrylic Paint – Lemon Custard, Baby Pink, Parisian Pink, Jamaican Sea, Lilac Love, Bright Green
- Chenille stems, kelly green
- Pom poms, ¾”assorted colors
- Scissors
- Paintbrush
- All-purpose glue
- Paper towels
- Paper plates
- Antibacterial spray
- Clothespins
![]() Directions:
Directions:
- Cut egg cartons apart, giving you individual “egg cups” to craft with.
- Use scissors to shape flowers, cut slits and create leaves.
- Using the clothespin to hold your flower and leaves, paint as desired. Turn some of the egg cups upside down and glue to the center of another cup to create different sizes and looks.
- Combine colors and shapes. Layer flowers with 2 or more cups.
- Have an adult poke small holes in the bottom of the cups and insert the chenille stems through the hole for the stem. Twist end of stems inside the cup to hold; add glue if needed.
- Glue pom poms to center of flower.
- Glue leaf shapes to chenille stem. Let dry completely before handling.
![]() Safety Tips!
Safety Tips!
- Spray the egg cartons with antibacterial spray before using to ward off any harmful bacteria.