Posts Tagged "Crayola"
Pipe Cleaner Turkey
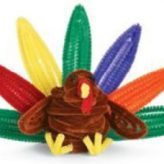
 The Pipe Cleaner Turkey is a terrific Thanksgiving project! This project is perfect for Brownies and Juniors, and can be easily done in 30-60 minutes. I would be helpful for the leader to complete one before the girls attempt it so it’s easier to help them. As well, the girls may need a model in person to refer to.
Want to share photos of your troop and finished projects? Contact Us!
![]() Materials Needed:
Materials Needed:

![]() Directions:
Directions:
- Bend 1 brown chenille in half. Set on work surface. To make head, connect 6 brown chenille by twisting ends together. Wrap around the large round marker overlapping so that the length does not exceed 2 inches. Glue the bent brown chenille into the head piece. Set aside.
- Take one brown chenille and wrap around the highlighter without overlapping to make the neck. Slip over the remaining chenille sticking out of head. Glue the top edge into head. Bend the chenille wire holding head/neck assembly into an upside down U shape. Set aside.
- The body requires 24 brown chenille stems that are connected and wrapped around the large paint bottle. Slip off bottle and gently squeeze into an oval shape. Pick up head/neck assembly, and glue into the body. Make sure the head is bent over the top of body, as if turkey is looking at you. Set aside.
- To make a wing, connect two brown chenille stems. Refer to photo to see shape of wings. They are shaped by hand. The stems touch only at the top of the wings. Glue them together along top to hold shape. Repeat for second wing. Twist wing ends together, so that they are 2 ½ inches apart. Glue wings onto turkey back.
- Bend the wire at the top of the back in, to close off opening behind head. Set aside. Cut one yellow chenille in half to make feet. Take one of the halves, and bend it in half. Measure ¾ ” back from bend, and bend the chenille at a 90 degree angle. Twist the ¾” together then separate the strands. Bend one piece up to make a V shape for the second toe. Measure and bend stem back at the ¾” mark. Repeat for third toe.
- Repeat step to shape other foot. Bend the leg ends up ½” from end, and glue into body base front edge. Set aside.
- Cut a 4″ piece of yellow to form beak. Bend in half, and then half again. Attach to head with glue. See photo for placement. Set in front of you. Cut a 4″ piece of red to form warble. Bend one end to fit over top of beak, allowing 1-¾” to hang down. Bend remaining back up, and twist to secure. Glue onto top of beak. See photo if necessary. Place turkey in front of you.
- Roll one end of black chenille into a little ball. Cut stem 1″ from rolled end. Stick stem end into head, and glue into place. Repeat for second eye. Refer to photo if necessary.
- You need five stems for each feather: 15 green, 5 red, 5 yellow, 5 purple and 5 orange. Twist 5 of the same color together and make a bend 7″ from one end to form an upside down V. The next bend should be 6″ further. Each time you go up into the feather shape, the next V should be slightly smaller to fit inside the previous one. Repeat until all the feathers are assembled.
- Lay 2 green feathers with their twisted ends together forming a horizontal line. Glue the purple and yellow feathers on top of the green ends to form a V shape at the top. Attach the orange and red feathers in like manner so they lay above the 2 green feathers at base. Glue the last green feather slightly above the orange/red ends. Refer to photo if necessary. Glue entire tail onto back base of your turkey.
![]() Safety Tips!
Safety Tips!
- When twisting the chenille stems together to connect, be careful because the ends can be sharp.
- Adult supervision is required.
Pinwheels
This is a great project for younger girls, as the pinwheels work pretty well but older girls might be a bit disappointed that they don’t work perfectly but they’re still awesome! That doesn’t really matter since, in my experience, pinwheels are really a toy more suited for younger girls anyway. You can spice up the project and colors by getting a pack of assorted colored drinking straws instead of plain white ones. The best straws are straight and not the kind with the bend in them.
Want to share photos of your troop and finished projects? Contact Us!
![]() Materials Needed:
Materials Needed:
- White construction paper
- Crayons, colored pencils, or markers.
- Plastic drinking straws
- Scissors
- Pencils
- Brass paper fasteners
- Pinwheel pattern.
![]() Directions:
Directions:
- Print the pinwheel pattern. You can reproduce this pattern on white construction paper with a copy machine. Be sure to cut the construction paper to 8½ in. by 11 in. You can also print the pattern out onto thicker colored paper directly.
- Cut out the pattern along the solid lines.
- Decorate the un-folded paper. Stickers might not work so well due to the folding and aerodynamics, but any other crayons, colored pencils, or markers should be fine for decorations.
- Cut the dotted lines from the four corners to the center circle, doing your best not to cut into the center circle.
- Use the sharpened pencil to poke a hole through the four tiny dark circles. The pencil point also works well to poke a hole into the straw, though you can also have an adult use a nail or a very small diameter hole punch. Carefully push the pencil point through the straw about ½” inch from the top.
- Make the tiny holes on the four points meet at the center circle.
- Push the brass fastener ends through the holes on the pinwheel. then push the fastener through the center circle.
- Place the straw on the back side of your pinwheel and push the ends of the fastener through the hole in the straw. Open-up the fastener by flattening the ends in opposite directions.
![]() Safety Tips!
Safety Tips!
- Adults should always make the holes when using a sharp object and working with younger girls.
- DO NOT allow the girls to punch holes with a nail if that’s the only implement you have.
- Adult supervision required when younger girls are using scissors.
![]() Quick Shopping for This Project
Quick Shopping for This Project
- Pacon Corporation Tru-Ray Construction Paper 9″x12″ White
- Crayola® Crayons – 64 Ct.
- Crayola® Classic Broadline Markers – 10 ct.
- Crayola Colored Pencils – 64ct.
- ACCO(R) Round-Head Solid Brass Fasteners, No. 4R, 1in., Box Of 100
- Drinking Straws
- Fiskars Creative Works Comfort Grip 7″ Scissors
Clay Picture Frame & Pencil Cup Set
This can be a fun project for older girls with a little more motor skills for the modeling of the clay. Younger girls can still have a great time with this, but the finished product will not be as polished. You can make the frame and cup themed for school mascots, holidays, seasons, or any other theme you want to tie a craft into.
![]() Materials Needed:
Materials Needed:
- Crayola® Model Magic® Craft Pack
- Wooden frame
- Plastic cup
![]() Frame Directions:
Frame Directions:
- Flatten a piece of Model Magic® slightly larger than the frame, about ¼” thick.
- Cover the frame with the Model Magic®.
- Decorate the frame with additional pieces of Model Magic® as desired.
- Allow the modeling compound to air-dry.
![]() Pencil Cup Directions:
Pencil Cup Directions:
- Roll a piece of Model Magic® flat, about ¼” thick.
- Cover a plastic cup with the Model Magic®.
- Decorate the cup with additional pieces of Model Magic® as desired.
- Allow the modeling compound to air-dry.
![]() Safety Tips!
Safety Tips!
- Adult supervision is required.
- Have tweezers on hand in case of splinters from the wooden frame.
You can also use the Model Magic® to make figures for the tops of pencils to match the set.
![]() Quick Shopping for This Project
Quick Shopping for This Project
- Crayola Model Magic Craft Pack
- Mulicraft Imports Natural Pine Photo Frame, 7.25″ x 9.5″
- Creative Expressions 12-Oz. Premium Plastic Cups – 20-Pack, True Blue